
Welcome to Resty!
Resty allows you to integrate according to the complexity level of your business. It can meet a wide range of needs, from simple business use to customized functionality and system integration using APIs and webhooks.
Table of Contents
- Getting started with resty
- Schemas
- Flows
- Setting up custom validation and data transformation
- Integration with collaboration tools
- Calling external APIs from resty
- Using resty's API
- Data Analysis (Looker Studio)
- Configuration example
Getting started with resty
If you are new to resty, follow these steps to get started. If you are not an administrator, you can start using resty immediately by requesting an invitation email from the administrator.
Administrators should follow these steps to create a new tenant and configure settings:
-
Log in to resty and create a new tenant.
-
Create a team to use resty in the Teams section.
-
Create schemas to store the necessary data for your business and grant permissions to each team in the Schemas section.
-
Pre-register various master data required for your business.
-
Invite users and start working in the Users section.
Schemas
https://www.resty.tokyo/en/schemas
With resty, you can build master data suitable for your workflow.
It can be used for various purposes such as task management, documentation, CRM, project management, and contract management.
Schemas can be created and updated from Schema, and each schema field can be designed to be more flexible and fit your business by specifying the field type.
You can also reference and relate master data to other master data, and use the full-text search and comment functions.
For detailed functions and available field types, please refer to Schema Creation.
Flows
https://www.resty.tokyo/en/flows
In resty, you can build flexible automated processes using flows. You can configure collaborations with other tools, create and update data according to rules, and set up processes that need to be executed periodically.

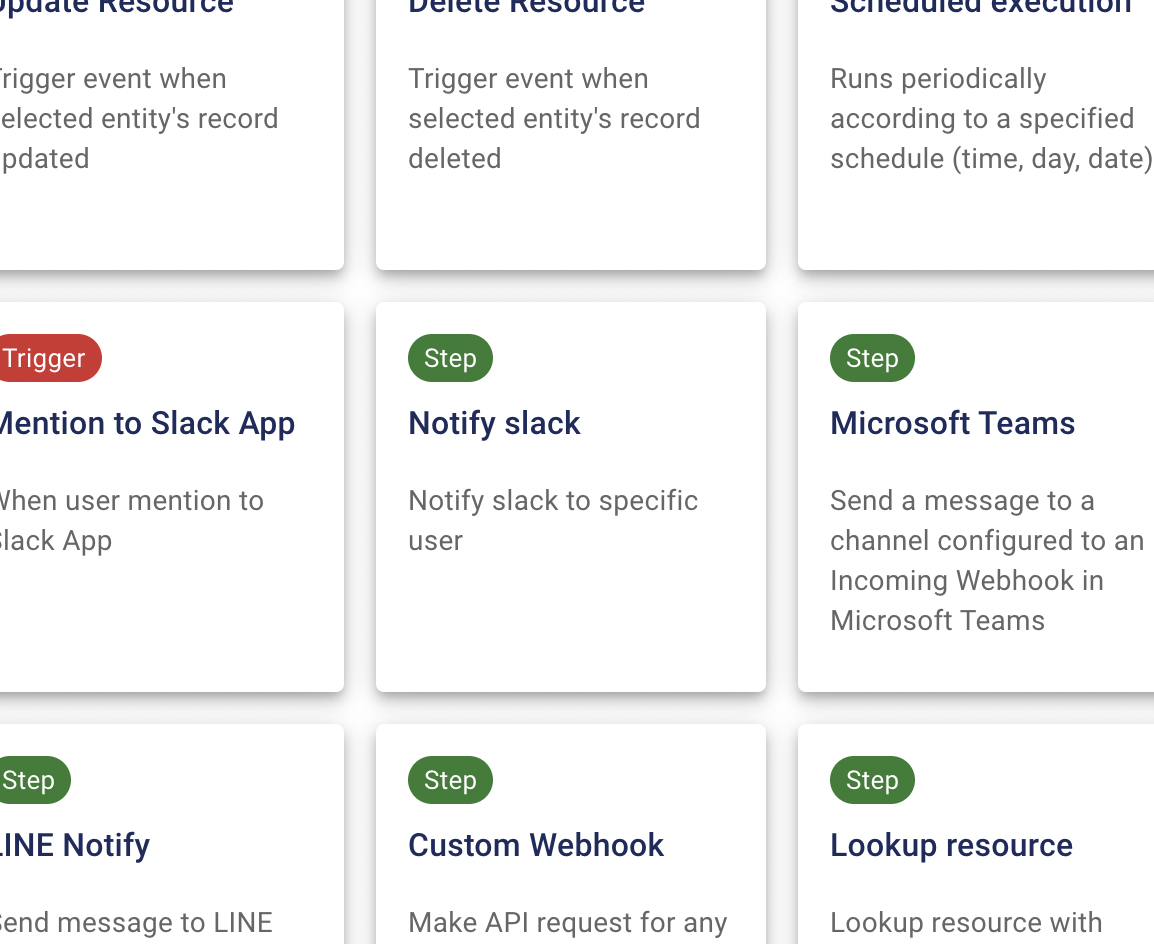
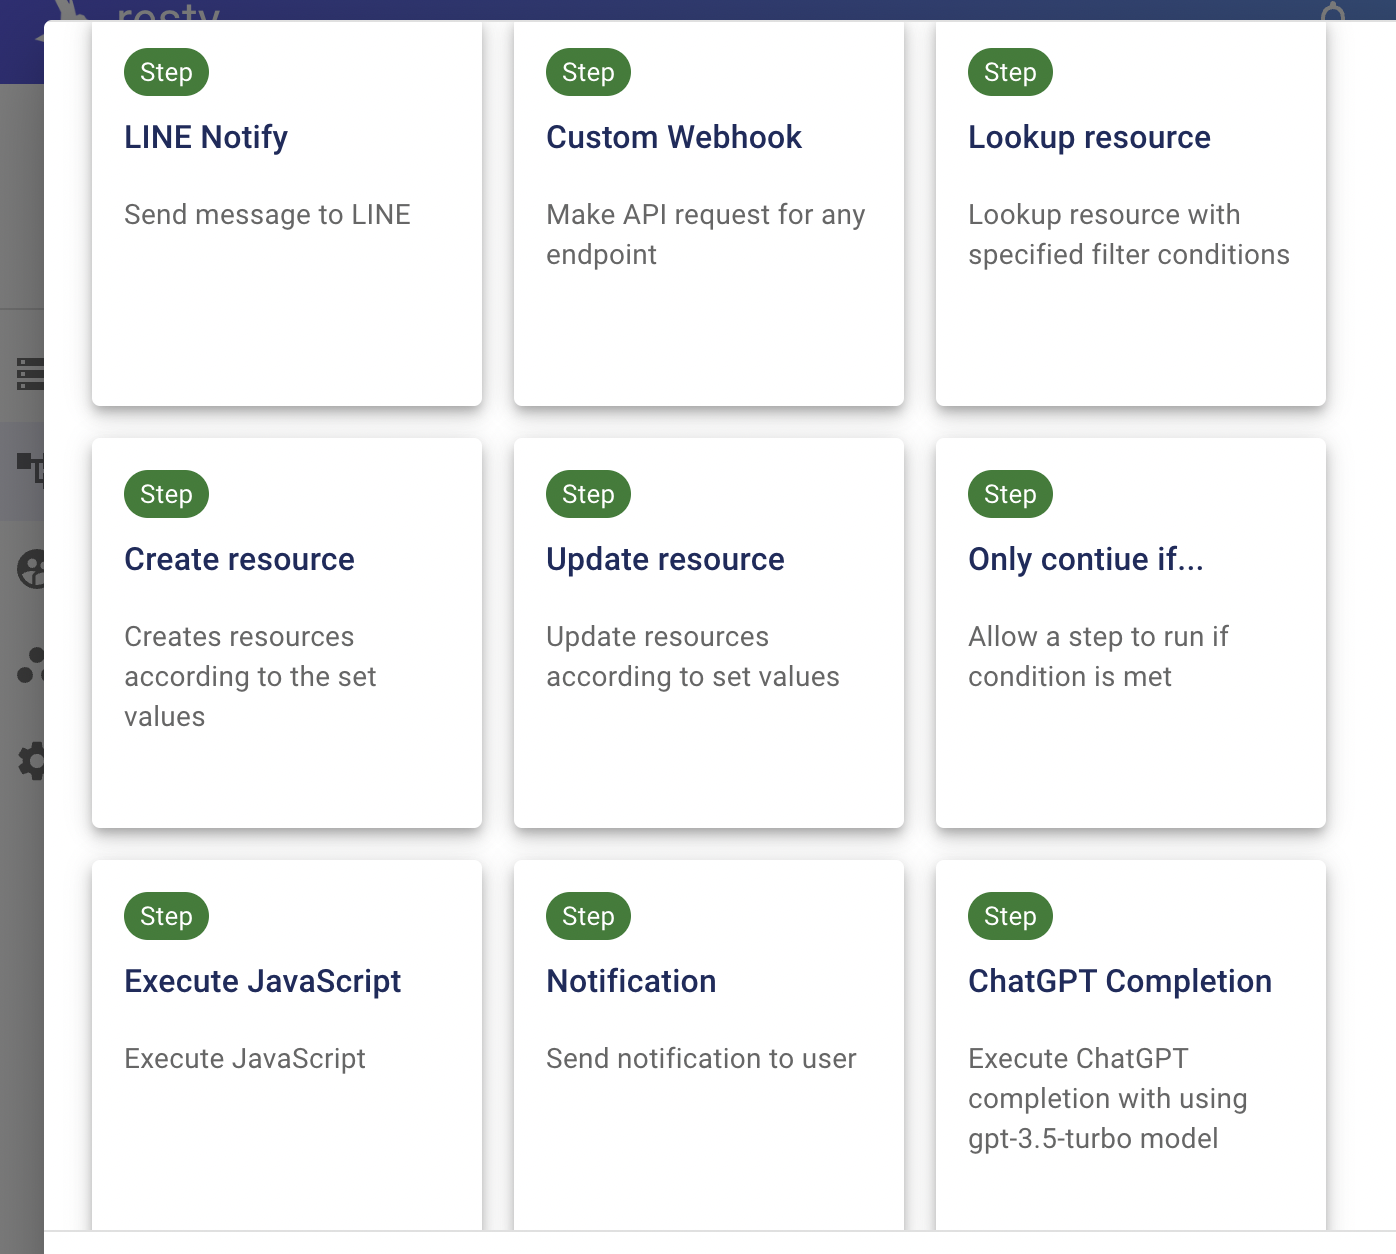
Flows consist of concepts such as Trigger, Step, and Connector. By connecting Trigger and Step using Connector, you can build automated processes.
Trigger and Step can be added from the Add button and can be moved by drag & drop.
A Connector can be added by connecting Trigger and Step.
Flow whiteboards can be moved by panning.
In Trigger, you define the events that serve as the starting point of the automated process.
In Step, you define the automated process you want to execute.
In Connector, you connect from Trigger or Step to the next Step and define the input parameters.
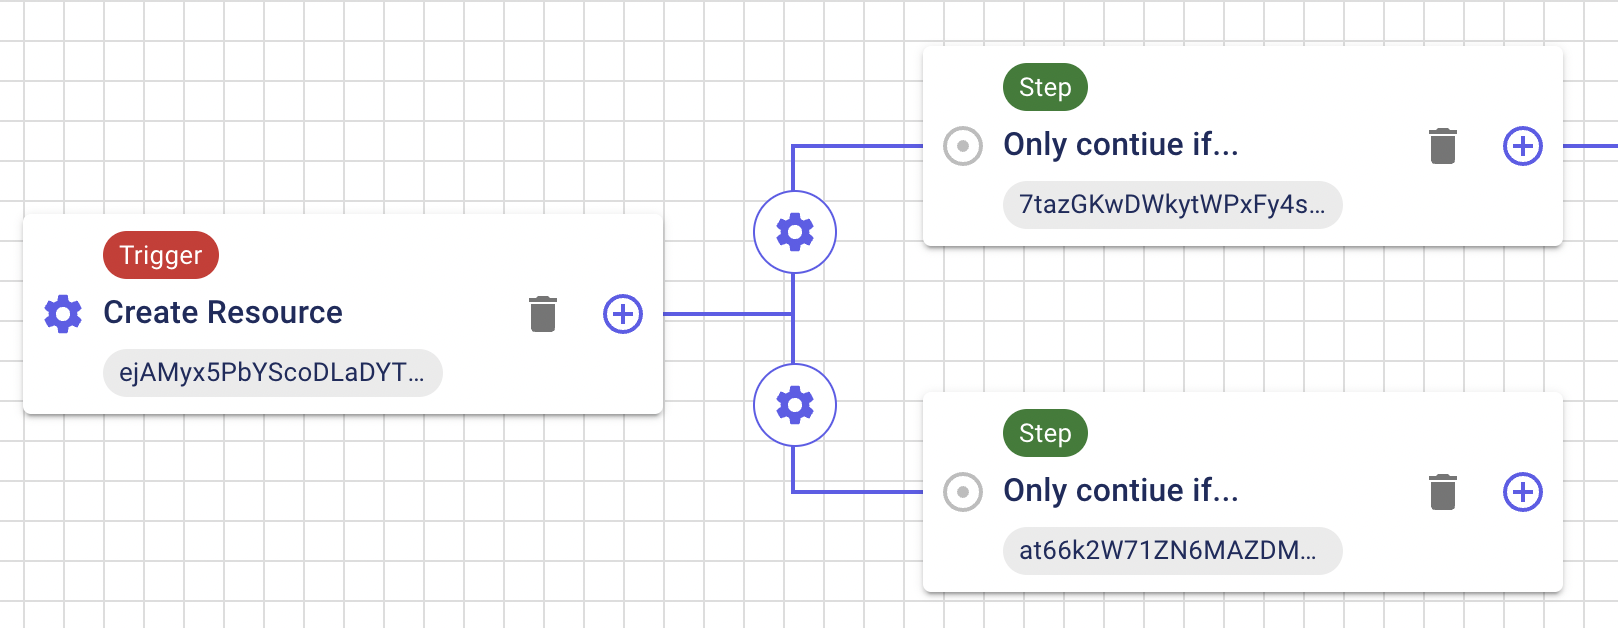
A Trigger can be connected to multiple destinations, but it cannot be connected as input from another Trigger or Step.
A Step can be connected to multiple destinations, but it can only have one input connection. You cannot connect multiple inputs.

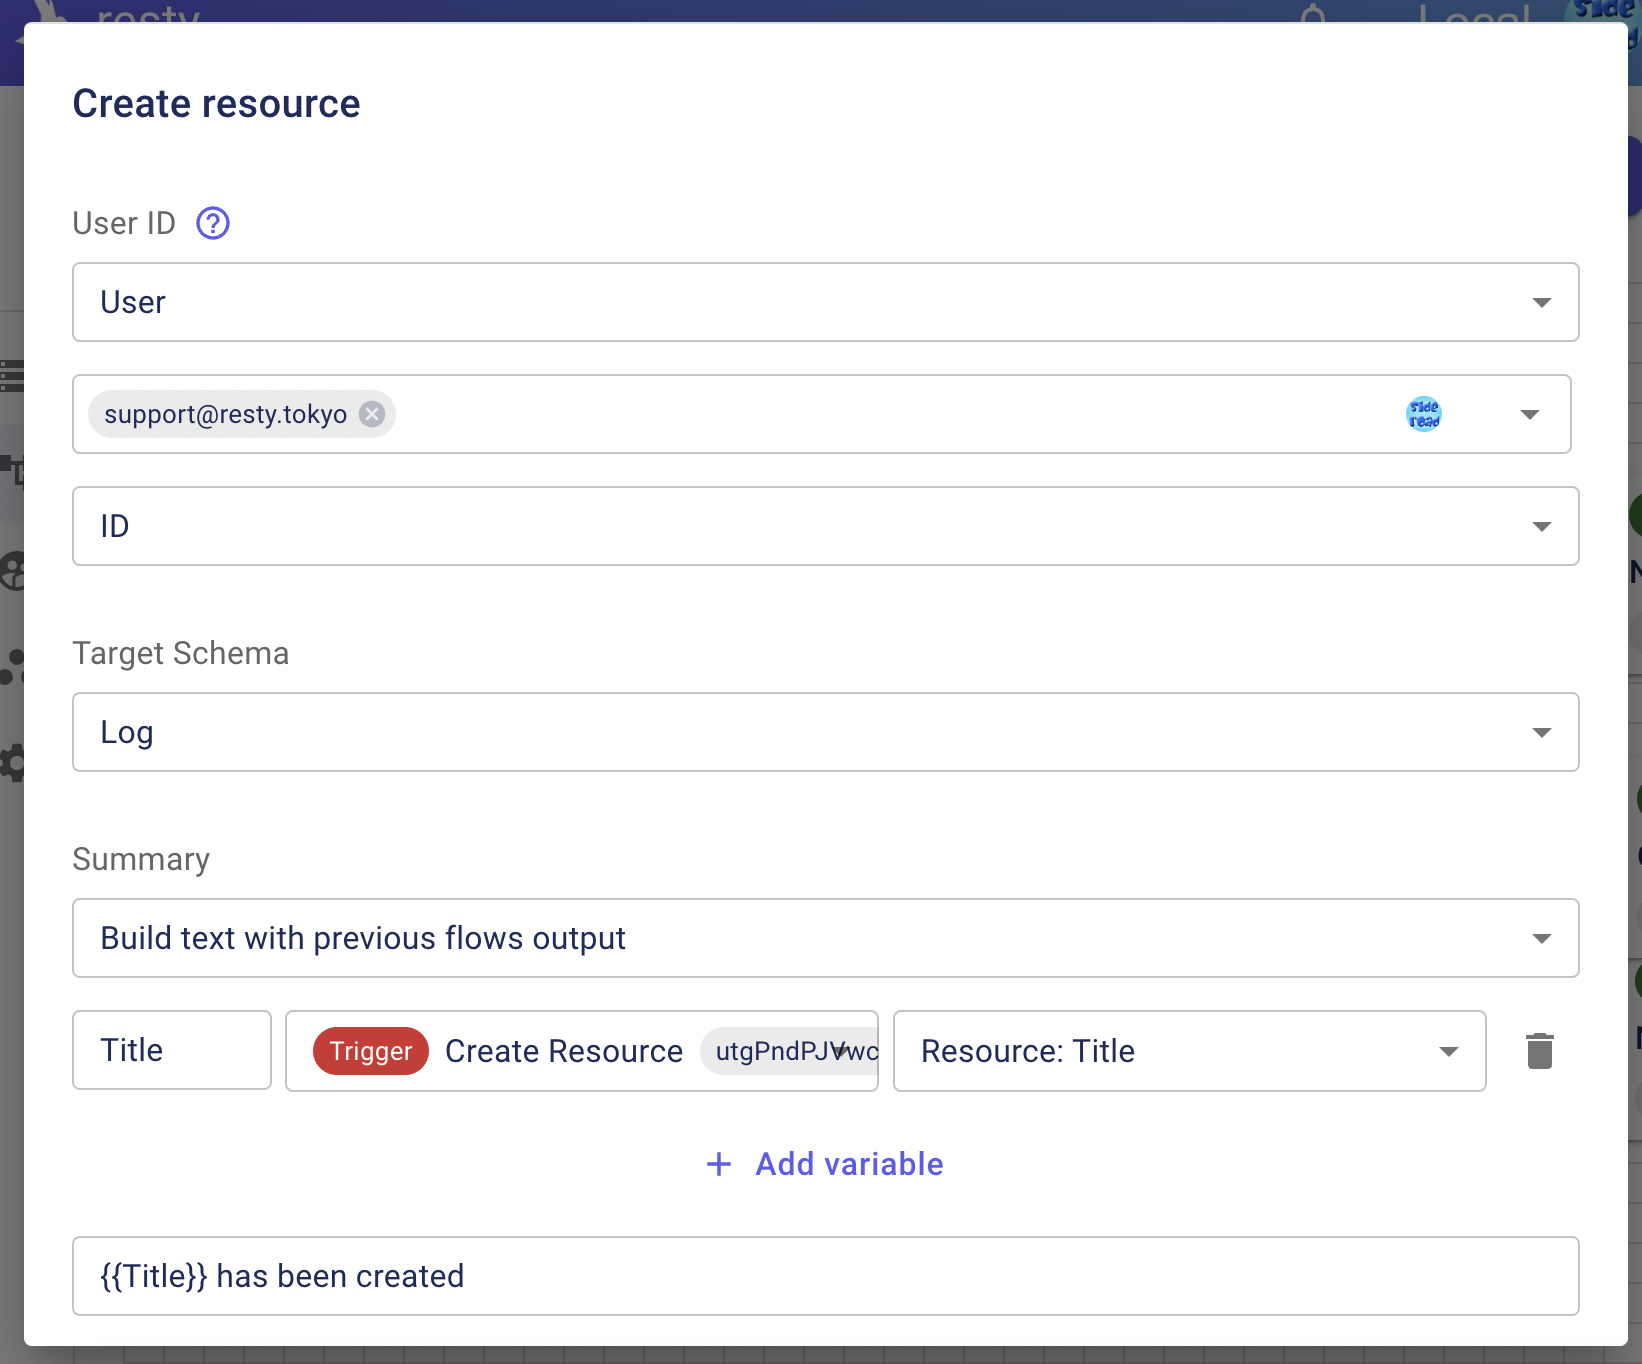
By clicking the "+" icon of any Trigger or Step and then clicking the "◎" icon of the connection destination, you can open the configuration dialog for the Connector. In the dialog, you configure the necessary parameters for the connected Step. The execution result of the source Step can be referenced by tracing back through the Connector.
Setting up custom validation and data transformation
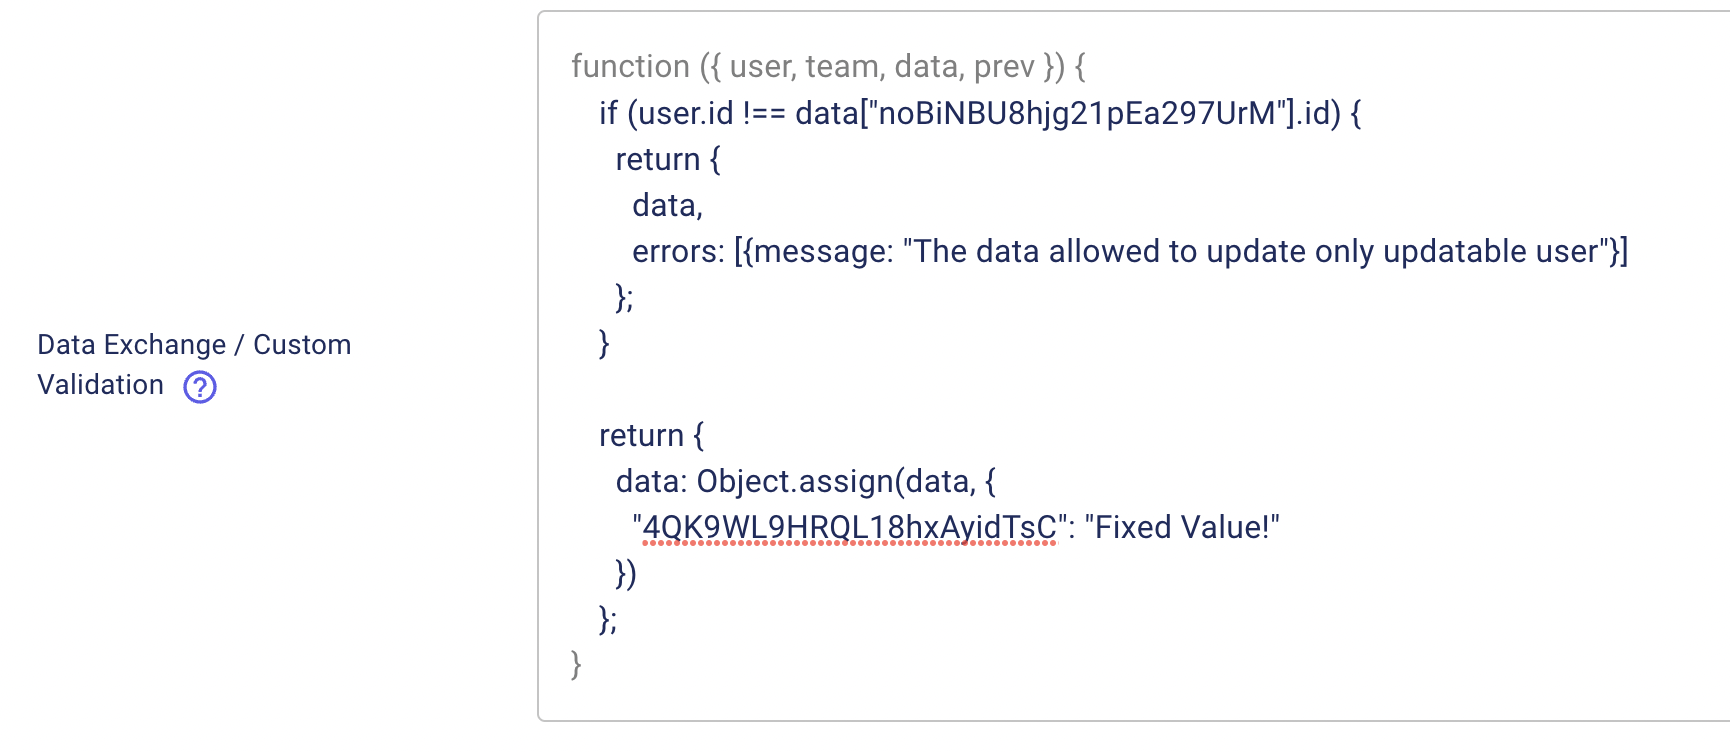
If you want to perform validation or data transformation based on arbitrary rules when registering or updating data, use "Data Transformation / Validation" in the Schemas section. Although accessing other resources or external APIs is not possible, you can perform custom validation based on the input data and execute data transformation before performing registration or update. JavaScript language knowledge is required to use this feature.
Integration with collaboration tools

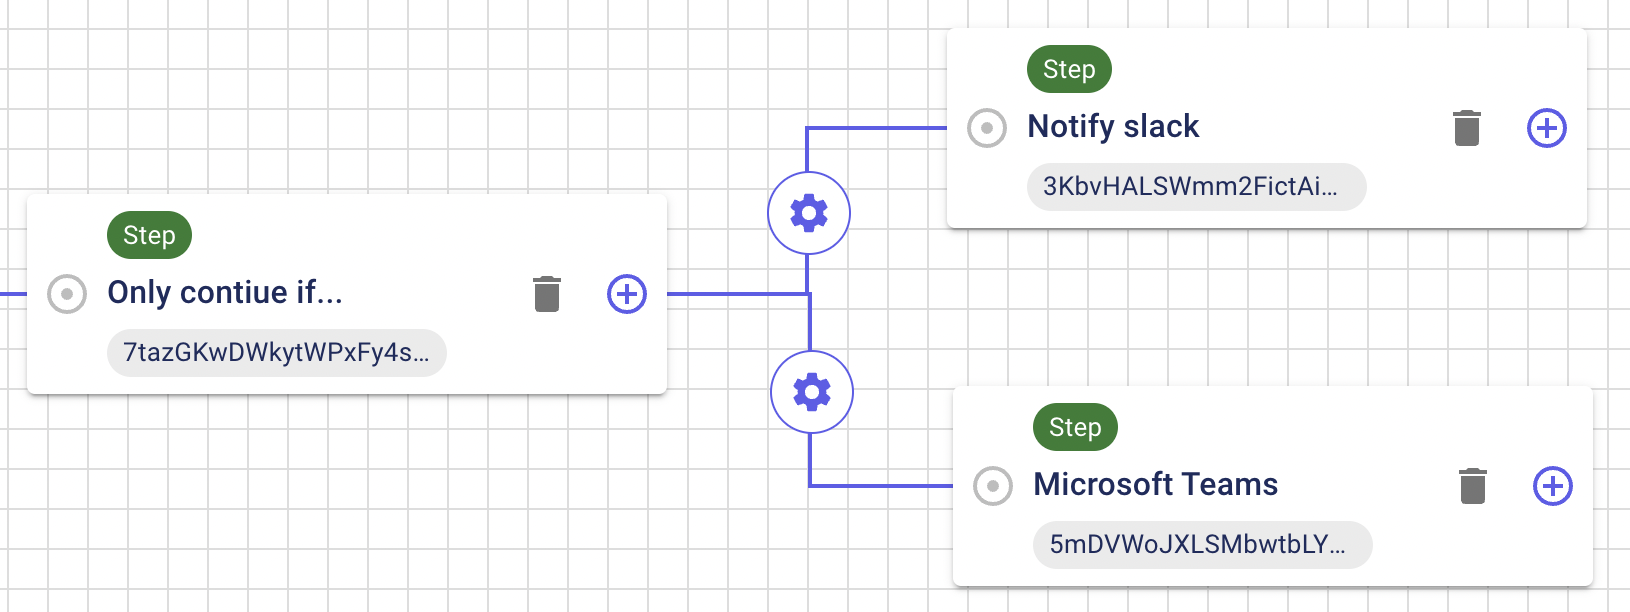
If you want to receive notifications when data is registered, updated, or deleted, configure the integration using steps on the Flows section. You can integrate resty with various collaboration tools such as Slack, Microsoft Teams, Chatwork, LINE notify. You can also use "desktop notification" by using the "Notification" step.
Integrate with Slack
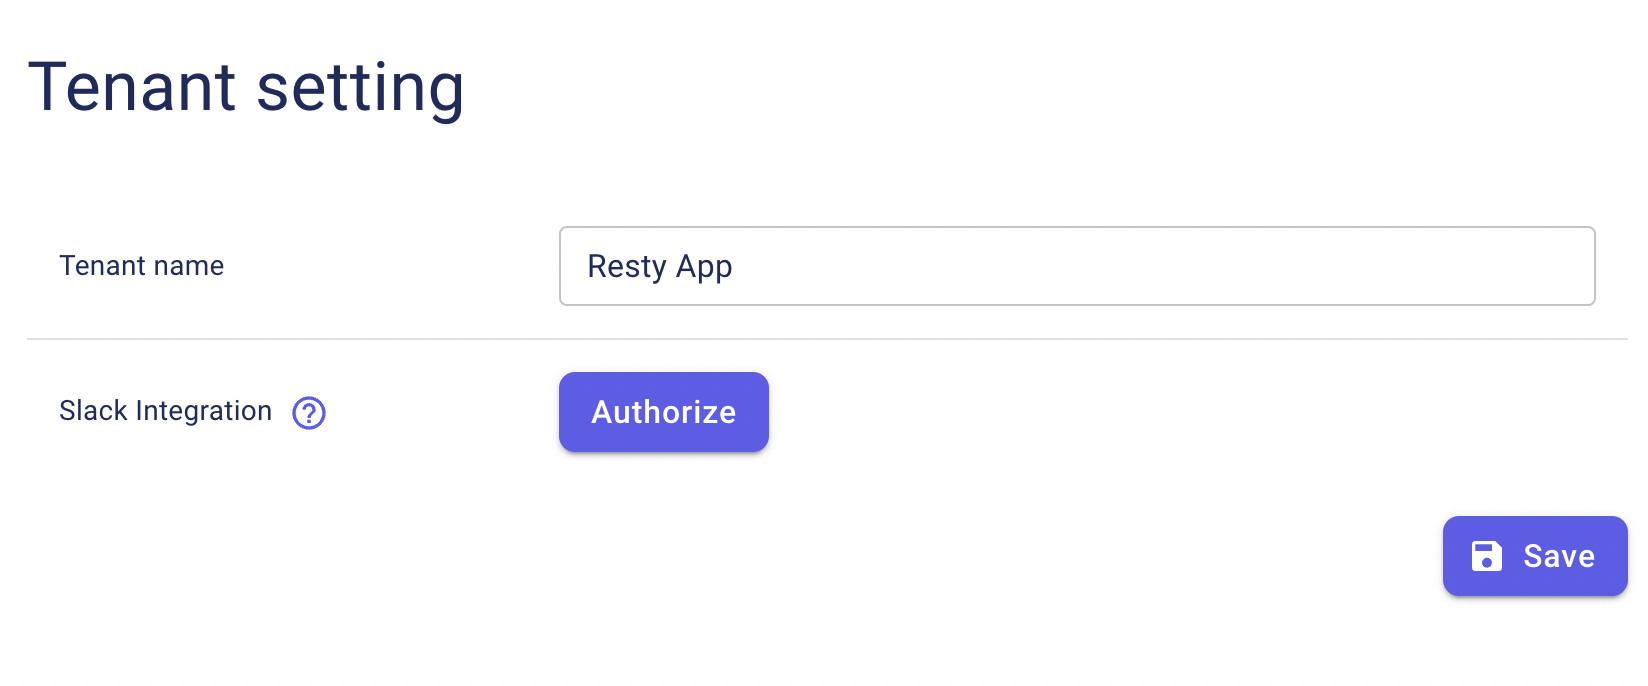
Click the "Slack Integration" authorization button in Settings to authorize.
Goto Flow, click the "Add" button and select "Notify Slack".
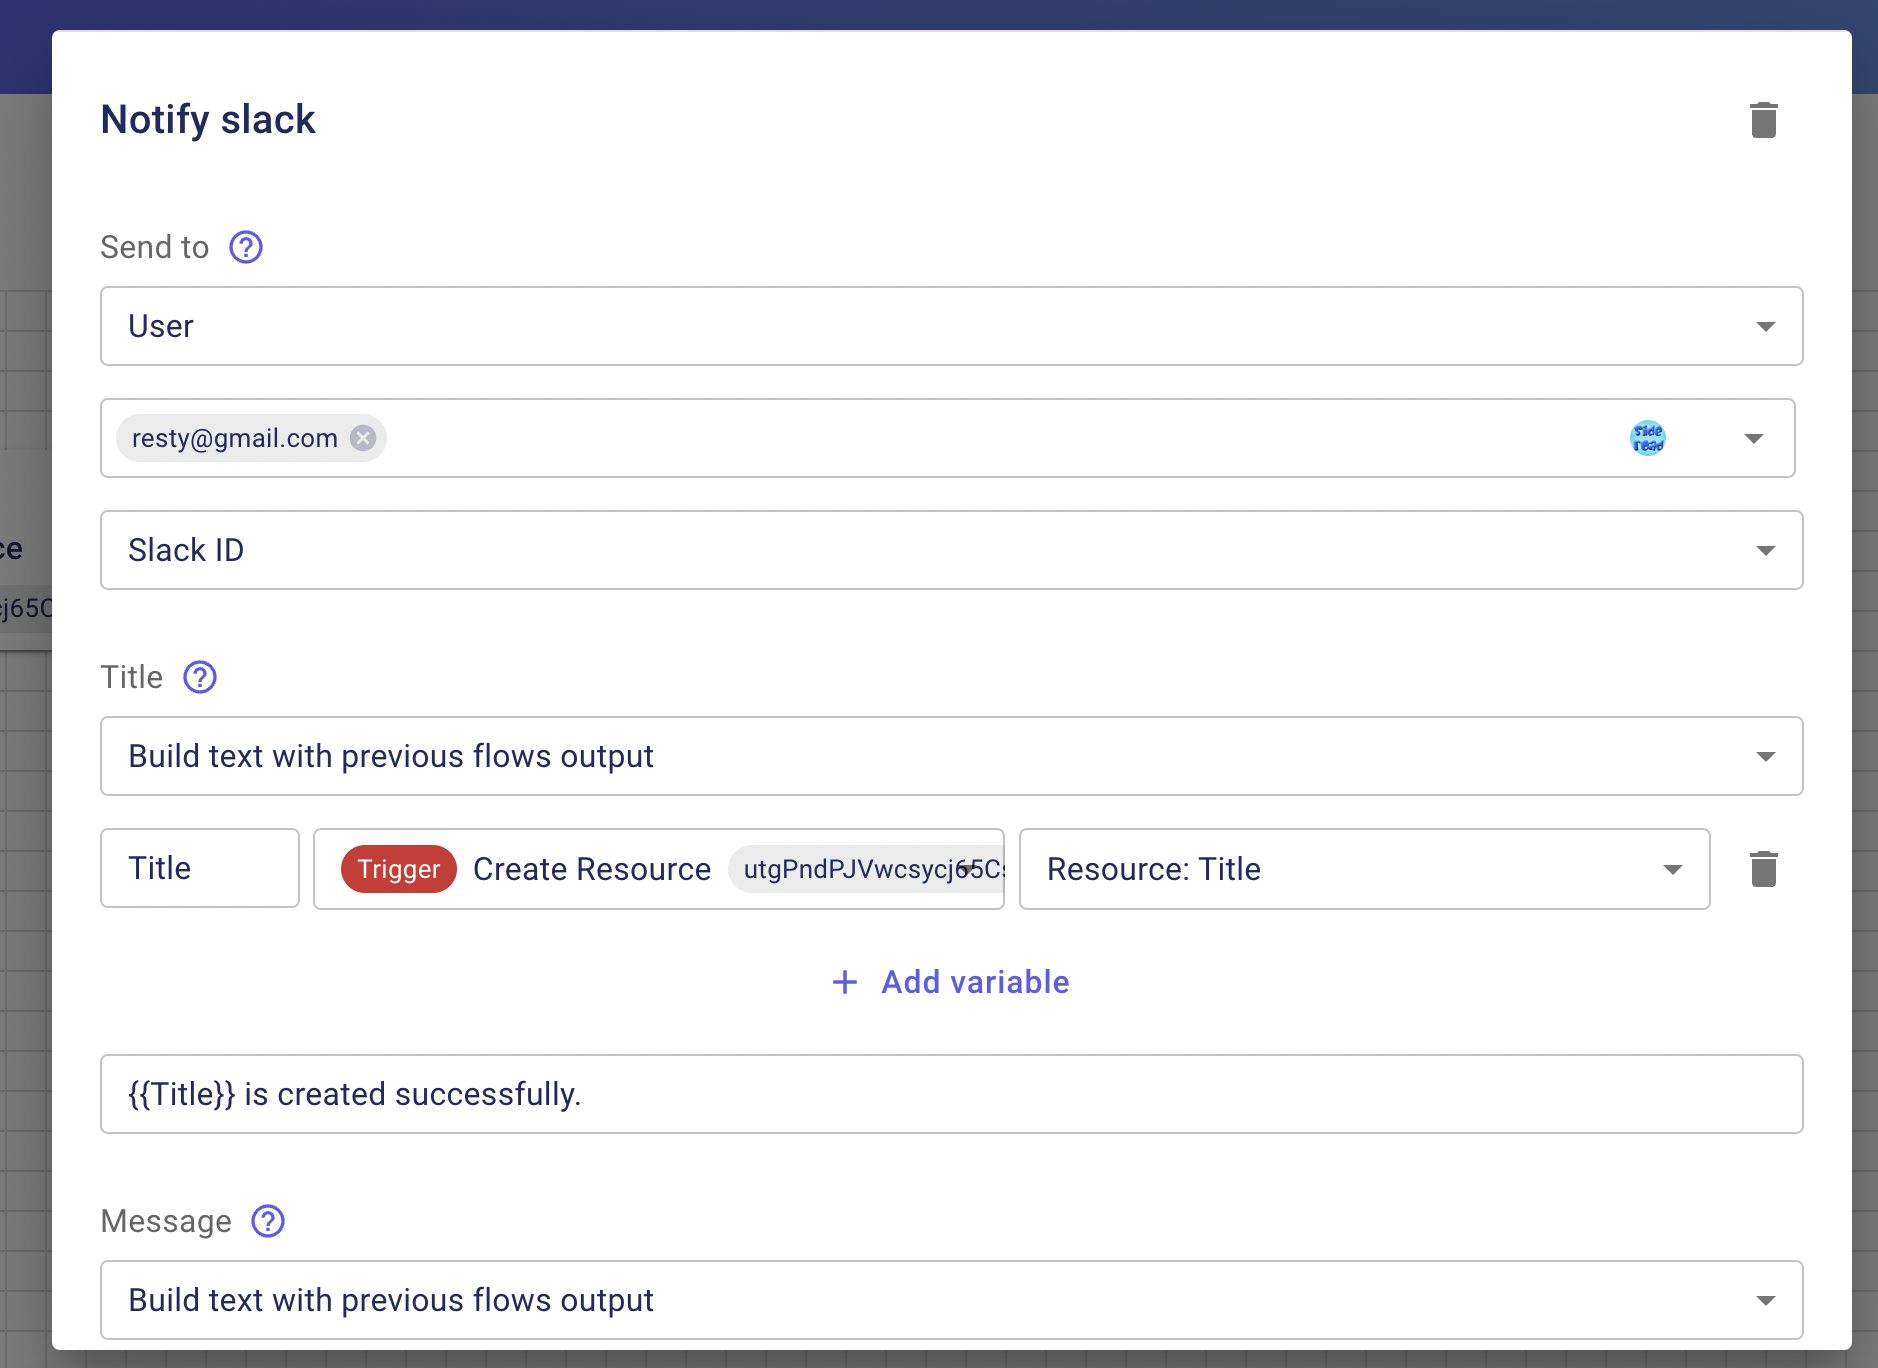
Connect to the "Notify Slack" you added from any Trigger or Step and set the parameters. Select the Slack ID of the user you want to notify.
Calling external APIs from resty
To make an API connection from resty to an external system, use the "Custom Request" step from the Flow. You can send a POST request to any API endpoint.
Using resty's API
When using resty's API from an external system, follow the steps below to connect to it based on the API credentials.
-
Check "Client ID" and "Secret Key" in the API authentication information in Settings
-
Generate a Signature based on the "Secret Key", the payload of the request, and the current time parameters, and make an API request with the Client ID and Signature in the request header.
The following is a sample implementation in Node.js.
(async function () {

  const crypto = require('crypto');

  // generate HMAC based on Secret Key

  const hmac = crypto.createHmac(

    'sha256',.

    `${paste_your_secret_key_here}`, // specify Secret Key

  );

  // Change it according to the actual payload you need

  // Make sure the value is a string when making a GET request

  const payload = {a: "1"};

  // ts parameter will be treated as an error if there is an interval of

  // more than 10 seconds from the time it was received by resty

  const params = { ...payload, ts: String(new Date().getTime()) }; }

  const query = new URLSearchParams(params).toString();

  // update the HMAC object based on the parameter information

  hmac.update(JSON.stringify(params));

  const res = await require('node-fetch')(`https://www.resty.tokyo/api/auth/me?${query}`, {

    headers: {

      'x-resty-client-id': `${paste_your_client_id_here}`, // specify Client ID

      'x-resty-signature': hmac.digest('hex'), // generate HMAC digest

    }, }

  }).then((res) => res.json());

  console.log(res);

})();
Data Analysis (Looker Studio)
To analyze data registered in resty, register a data source in Looker Studio using the "Create Report" button from the "Schema" page.
The registered data source can be used from the report.
Also, if you want to combine multiple data sources for analysis, use the "Integrate Data" function.
Configuration example
Here are some examples of settings using resty for different purposes.
Notify any user in Slack when new data is registered.
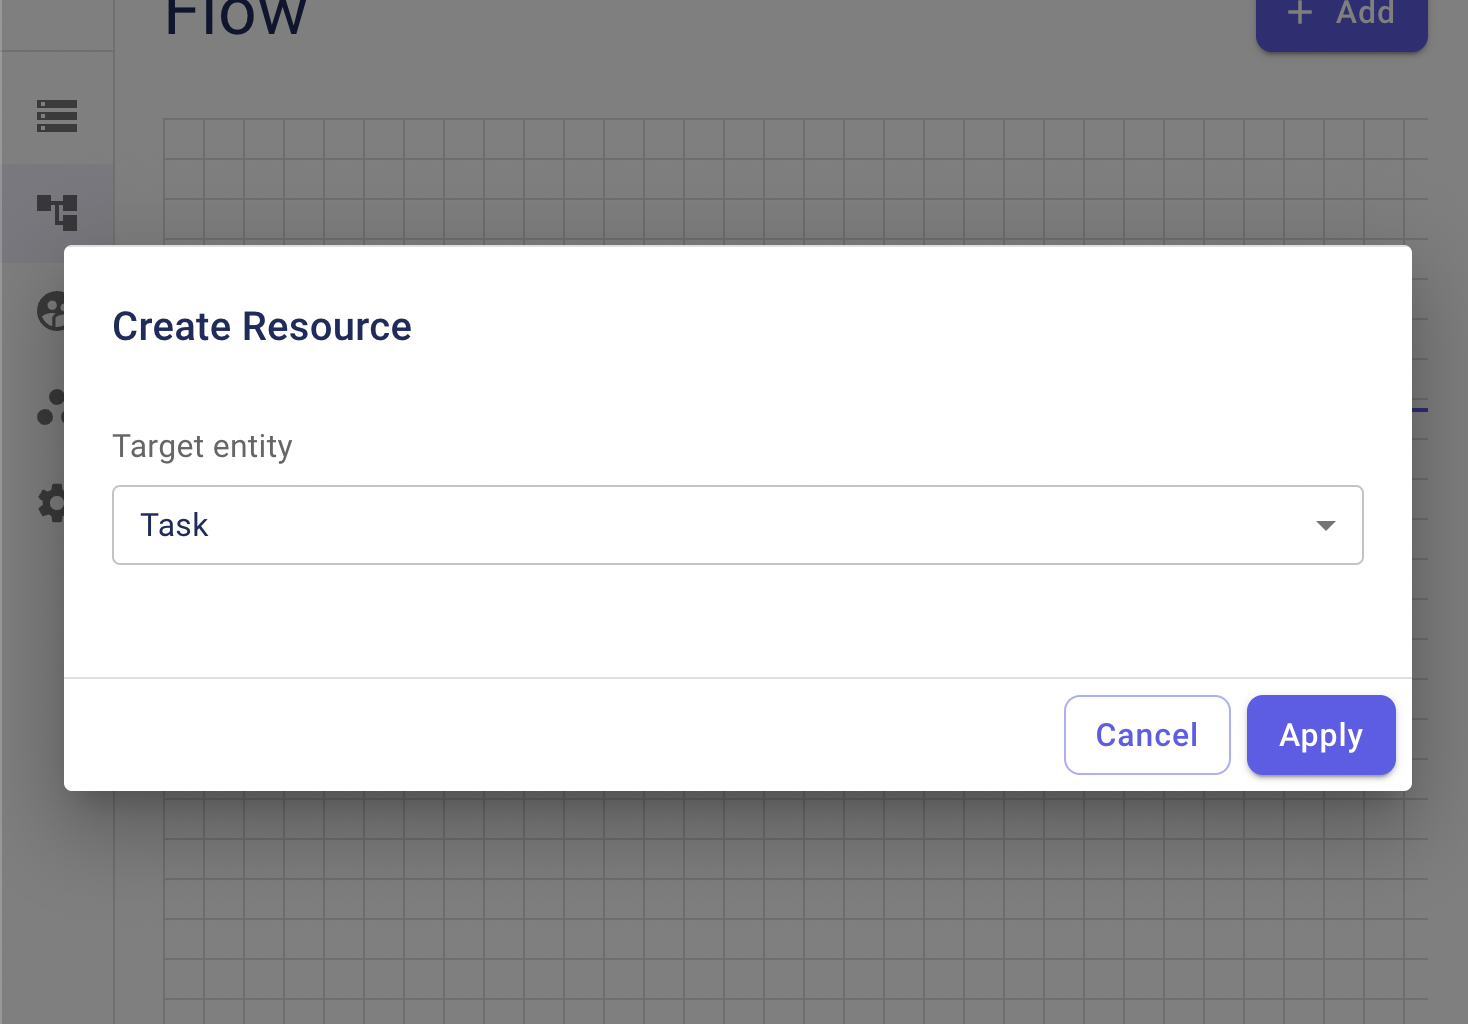
Goto Flow, click the "Add" button, select the "Add Resource" trigger, and select the target schema.
Goto Flow, click the "Add" button and select the "Notify Slack" trigger.
Connect "Add Resource" to "Notify Slack" and set the parameters.
Notify the user in charge of the data via Slack when the person in charge of the data is changed.
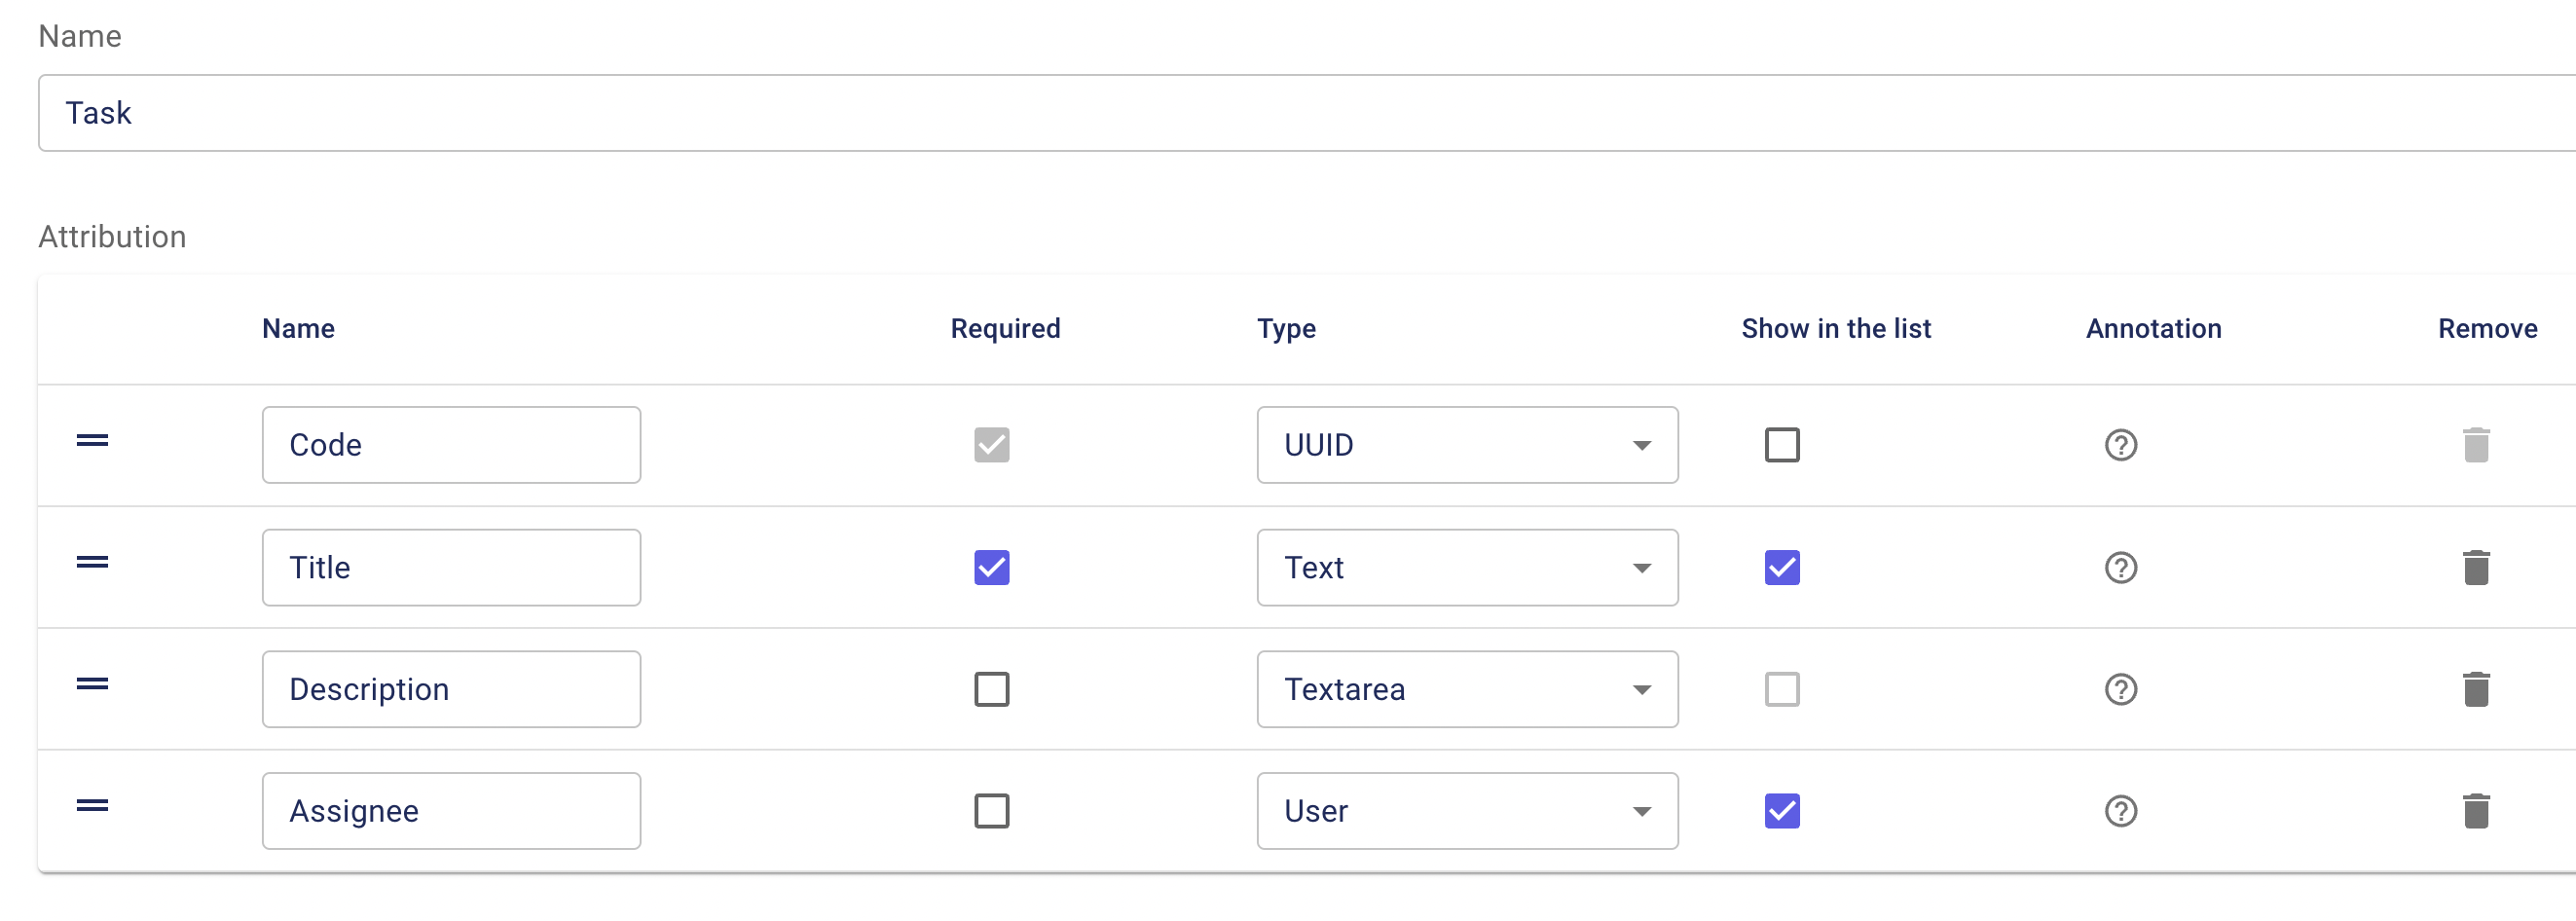
Register a field named "assignee" in the target schema with "user" as the column type.
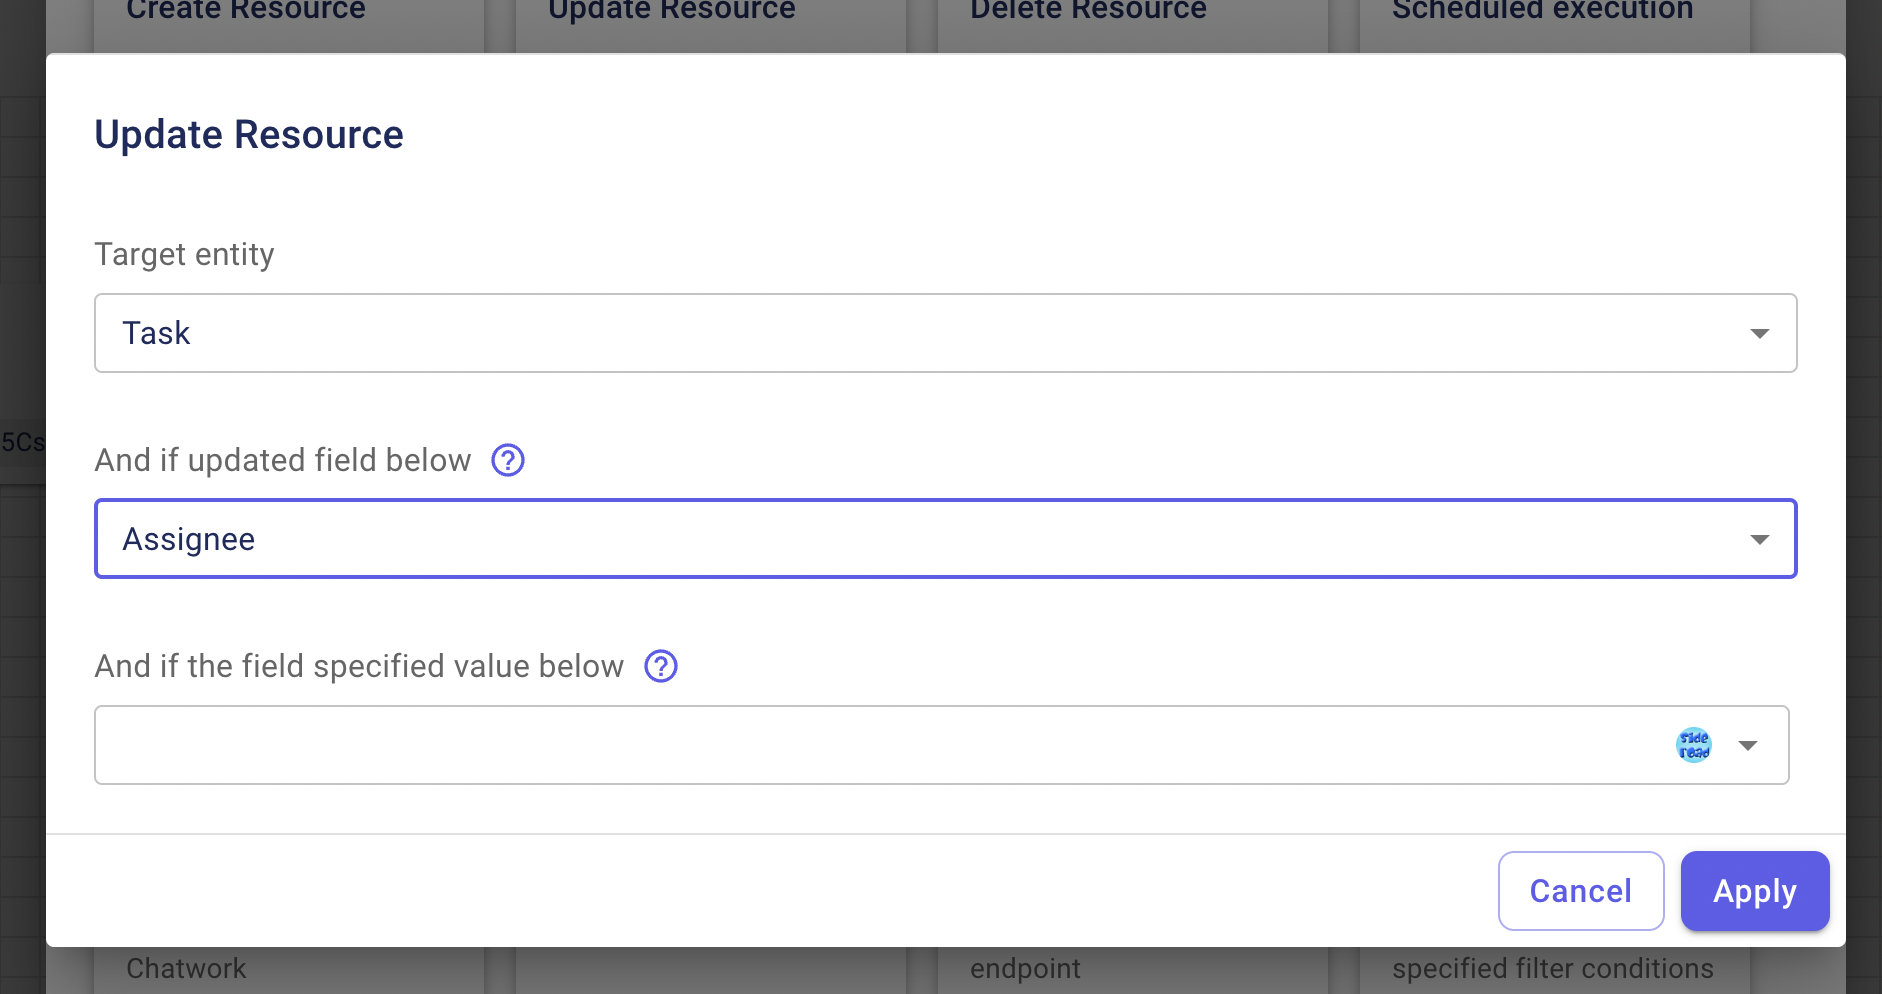
Goto Flow, click the "Add" button, select the "Update Resource" trigger, select the target schema, and select the "Contact Person" field.
Goto Flow, click the "Add" button and select "Notify Slack".
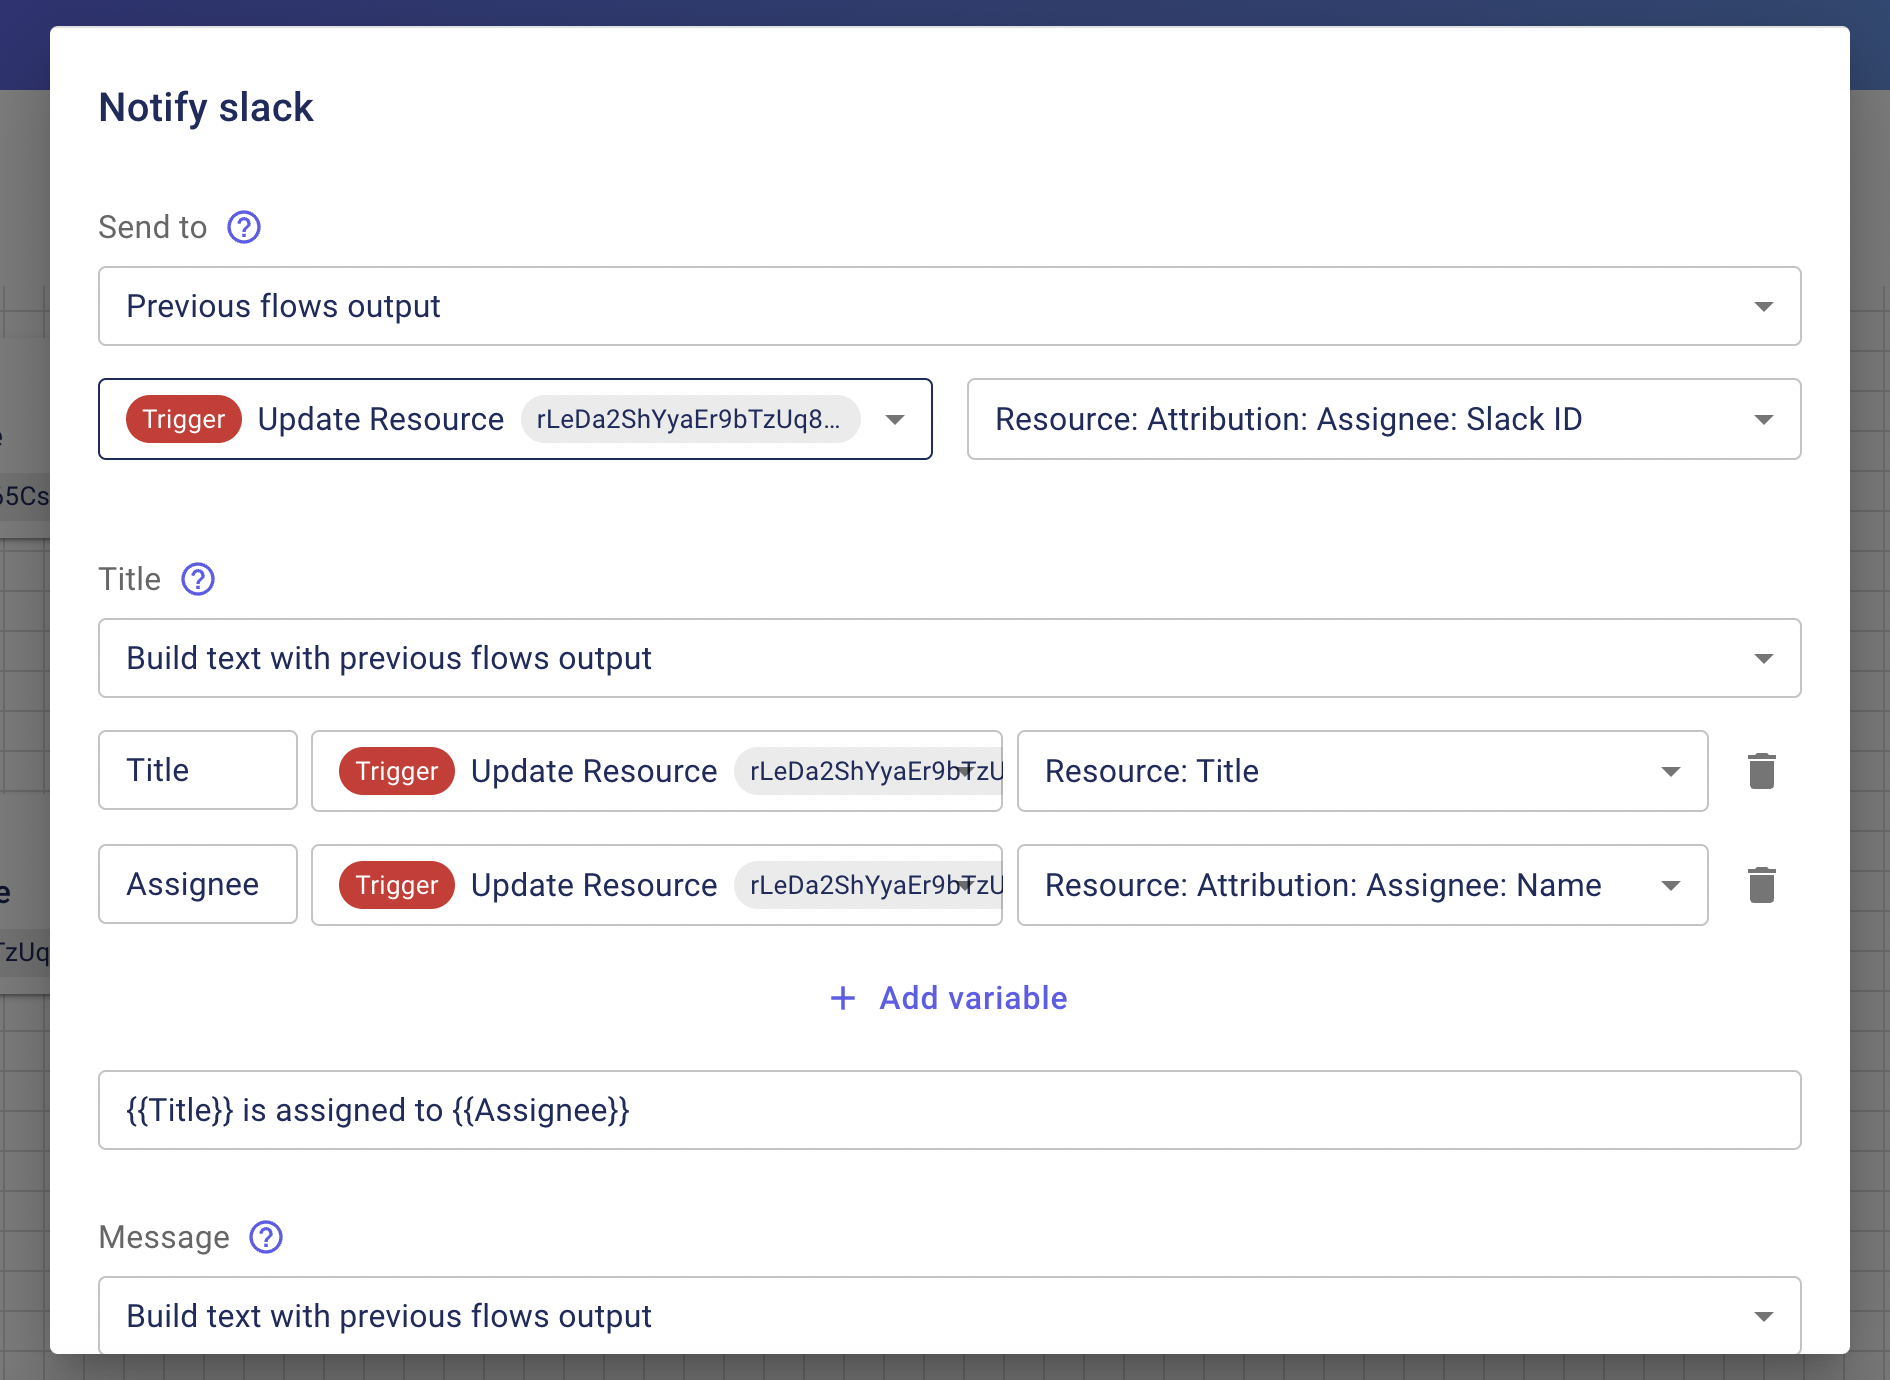
Connect "Update Resource" to "Notify Slack" and select "Resource: assignee: Slack ID" as the notification recipient.
Create log history
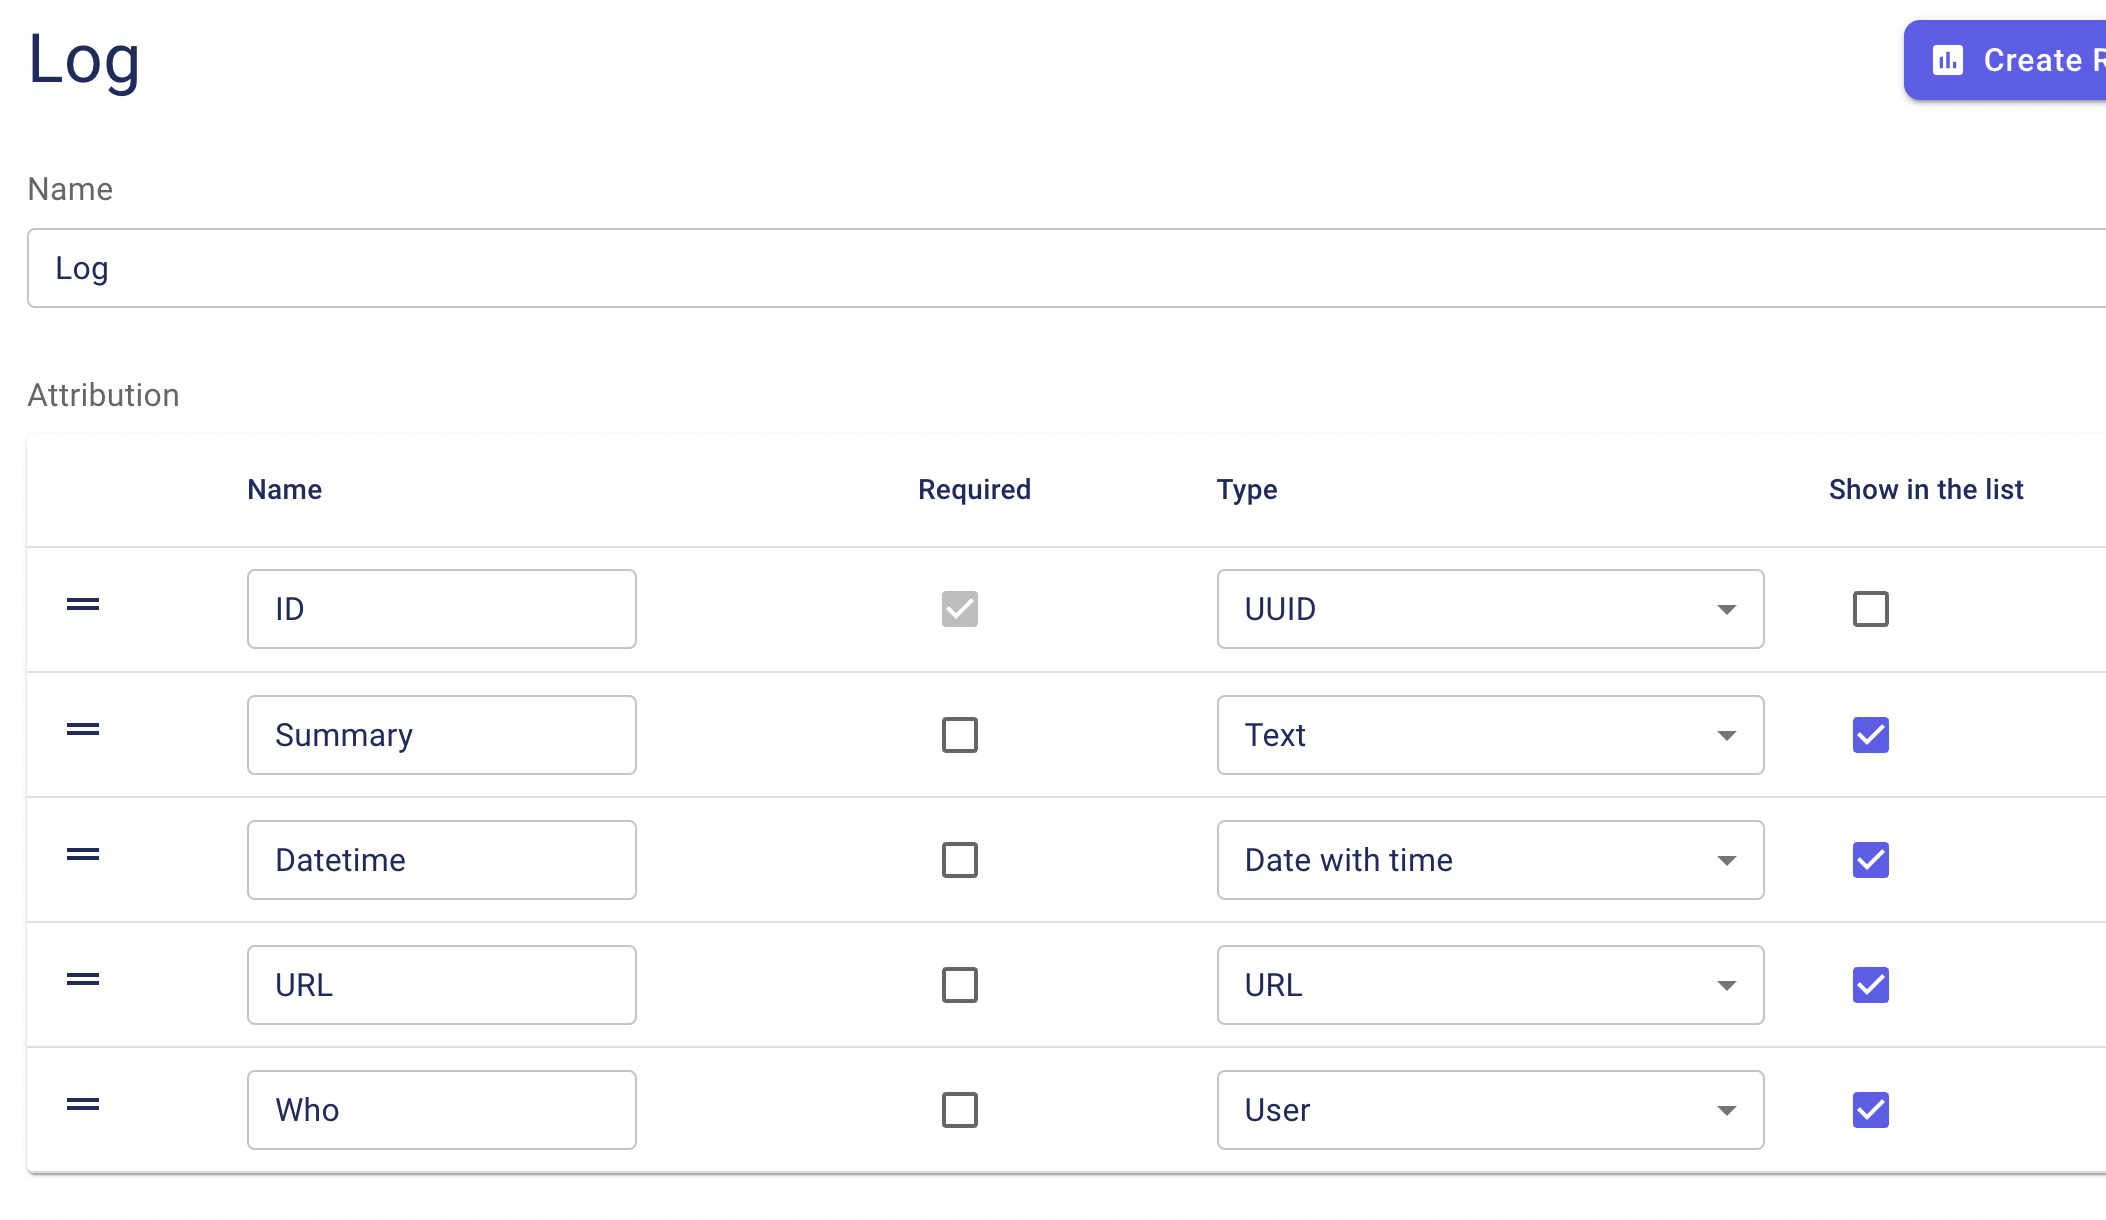
Click the New button under Schemas to create a log schema. It is recommended that only "Admin" be granted editing privileges. Grant only reference privileges to the team that wants to refer to the log.
Goto Flow, click the "Add" button, select the "Add Resource" trigger, and select the target schema.
Goto Flow, click the "Add" button and select the "Add Resource" step.

Connect [Create resource (trigger)] and [Create resource (step)] and set various parameters.
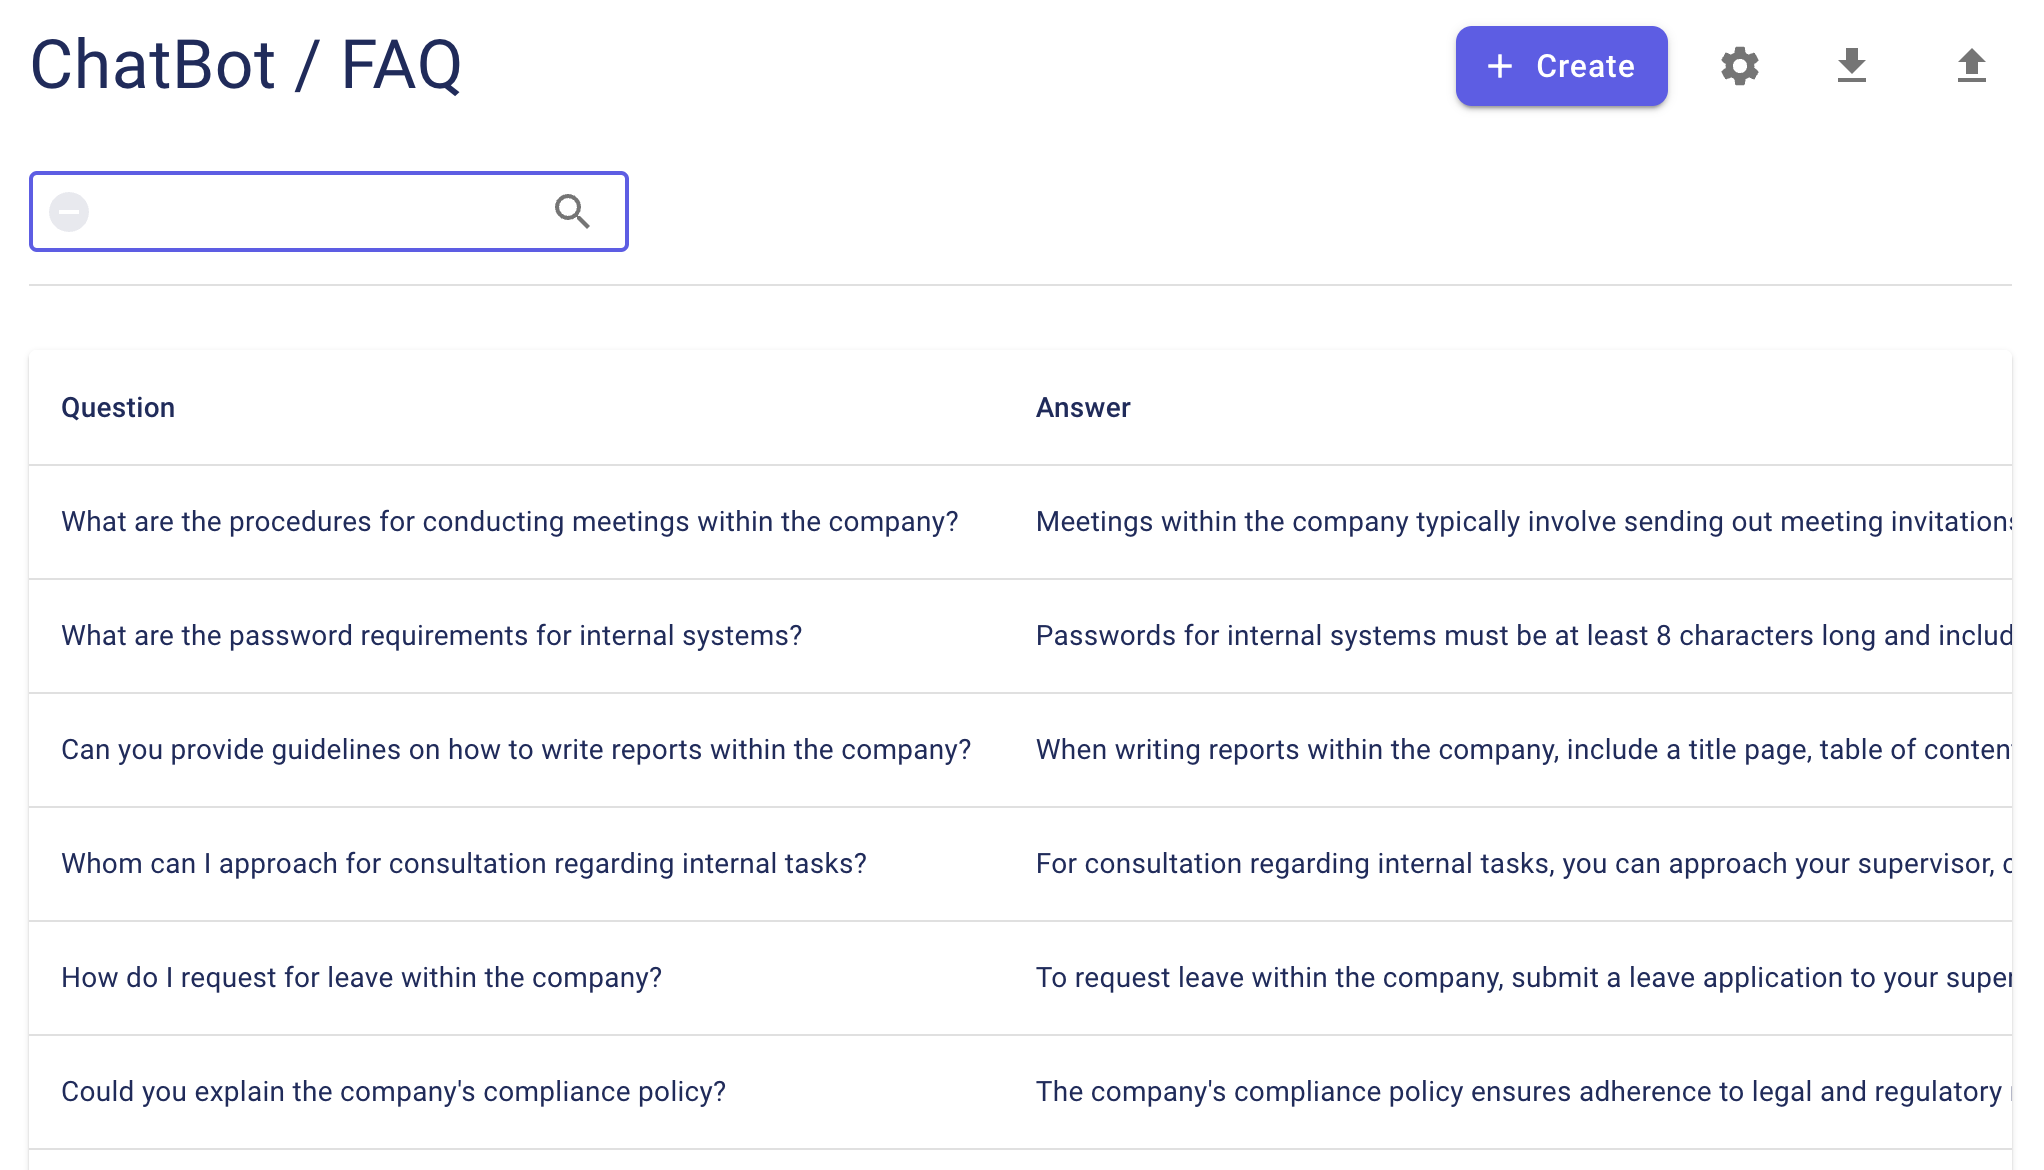
Create a chatbot for FAQ
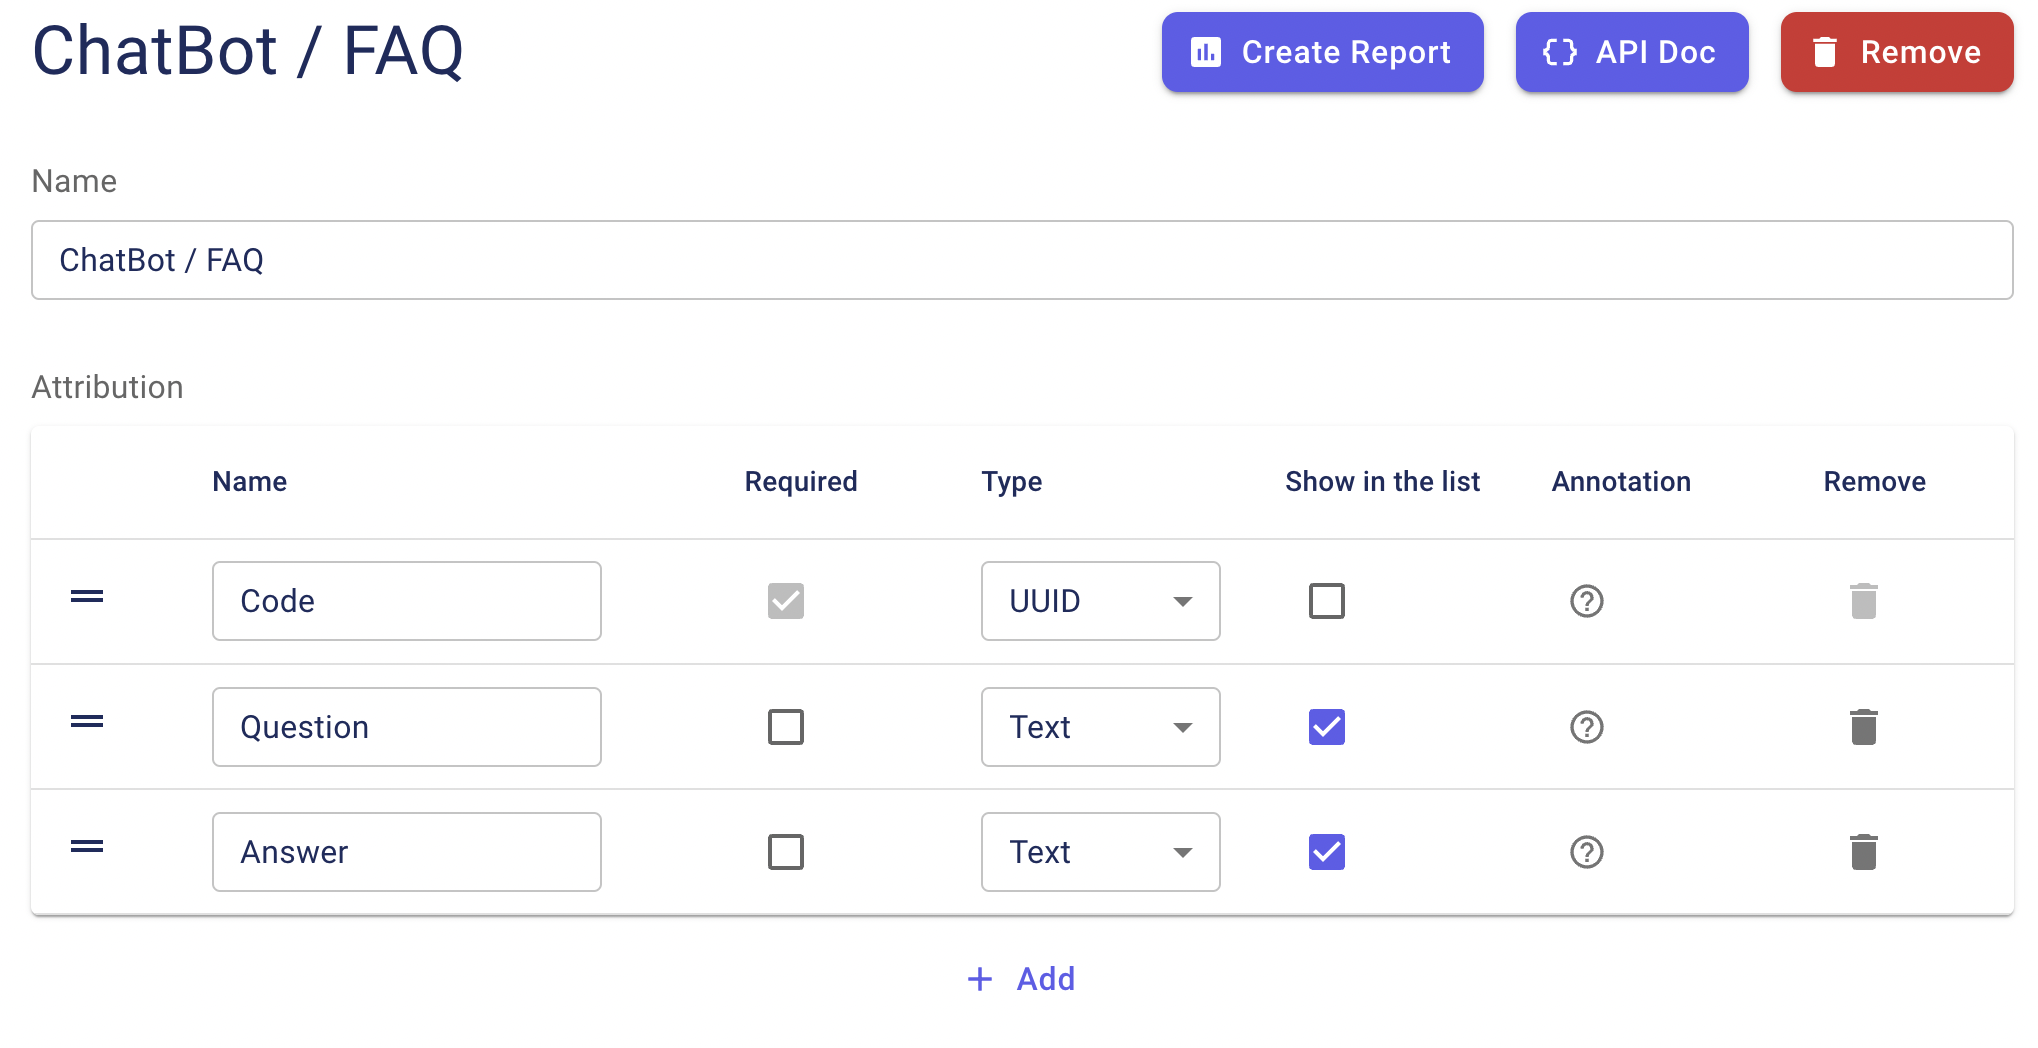
Click the New button under Schema and create a schema for the FAQ.
 !
!
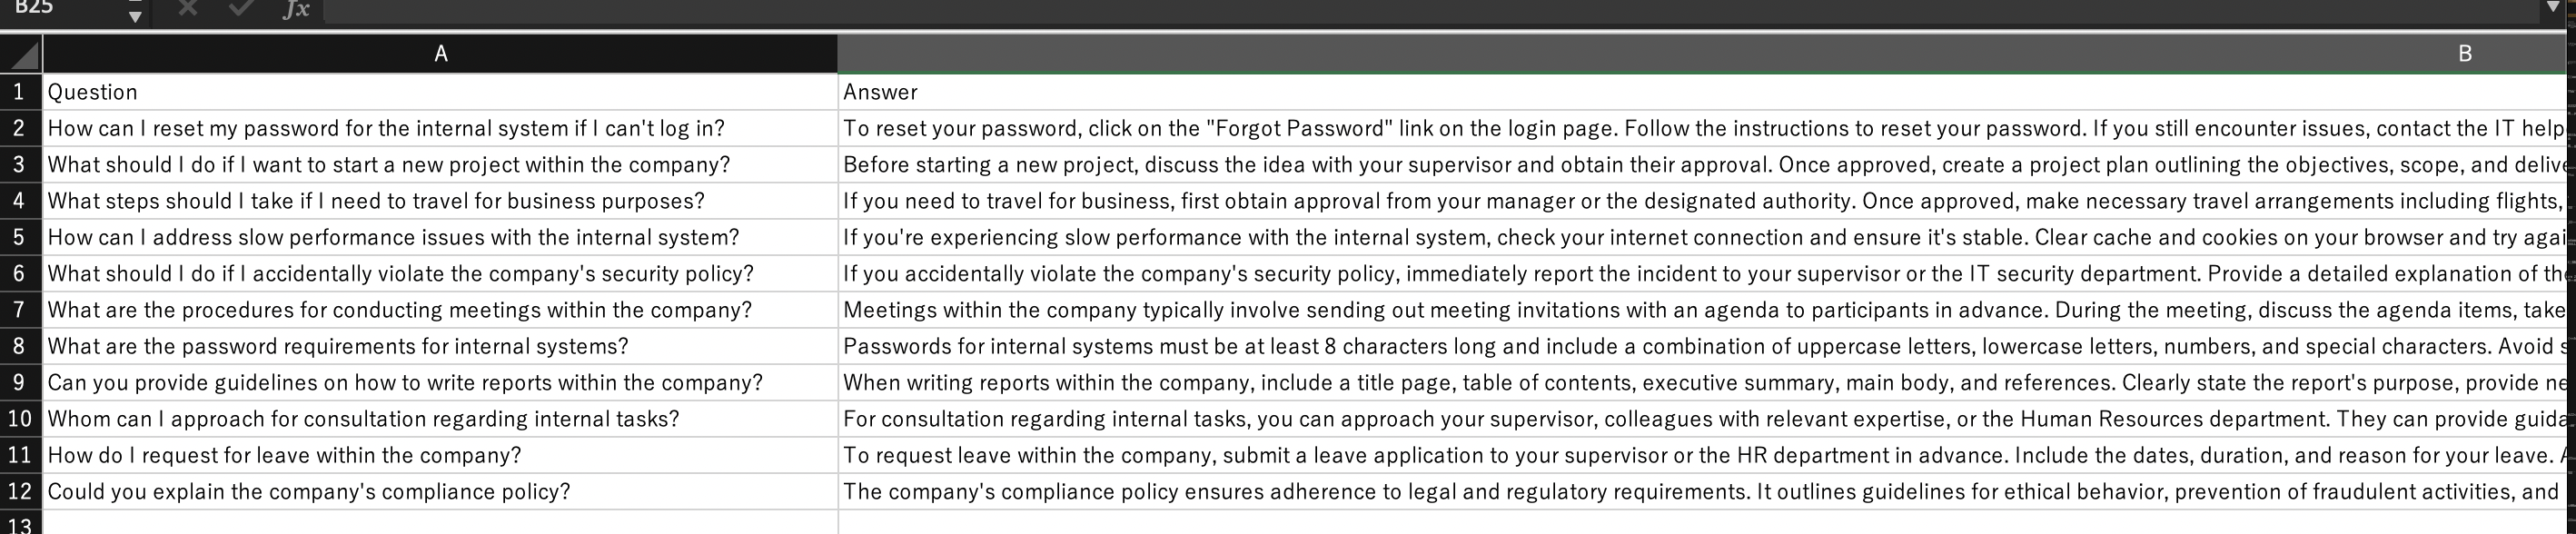
Prepare a CSV file of the FAQ questions and answers, and upload the CSV file from the FAQ list screen.
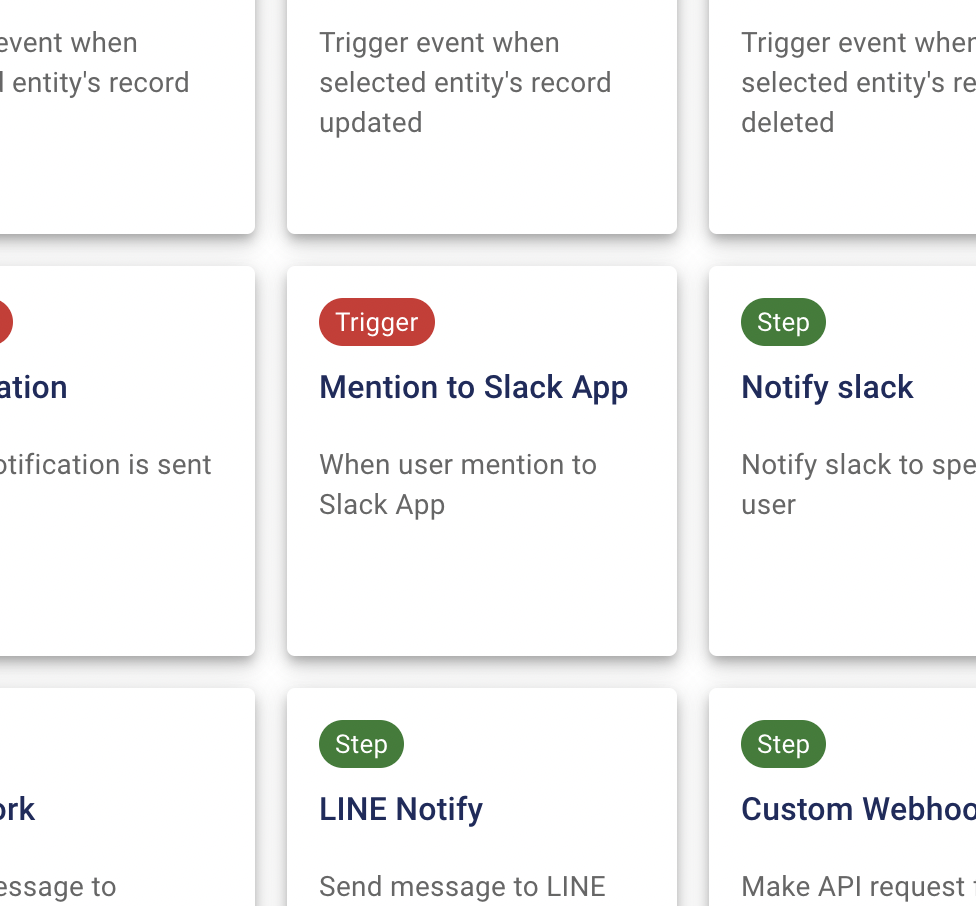
Click the "Add" button under Flow and select the "Slack App Mention" step.
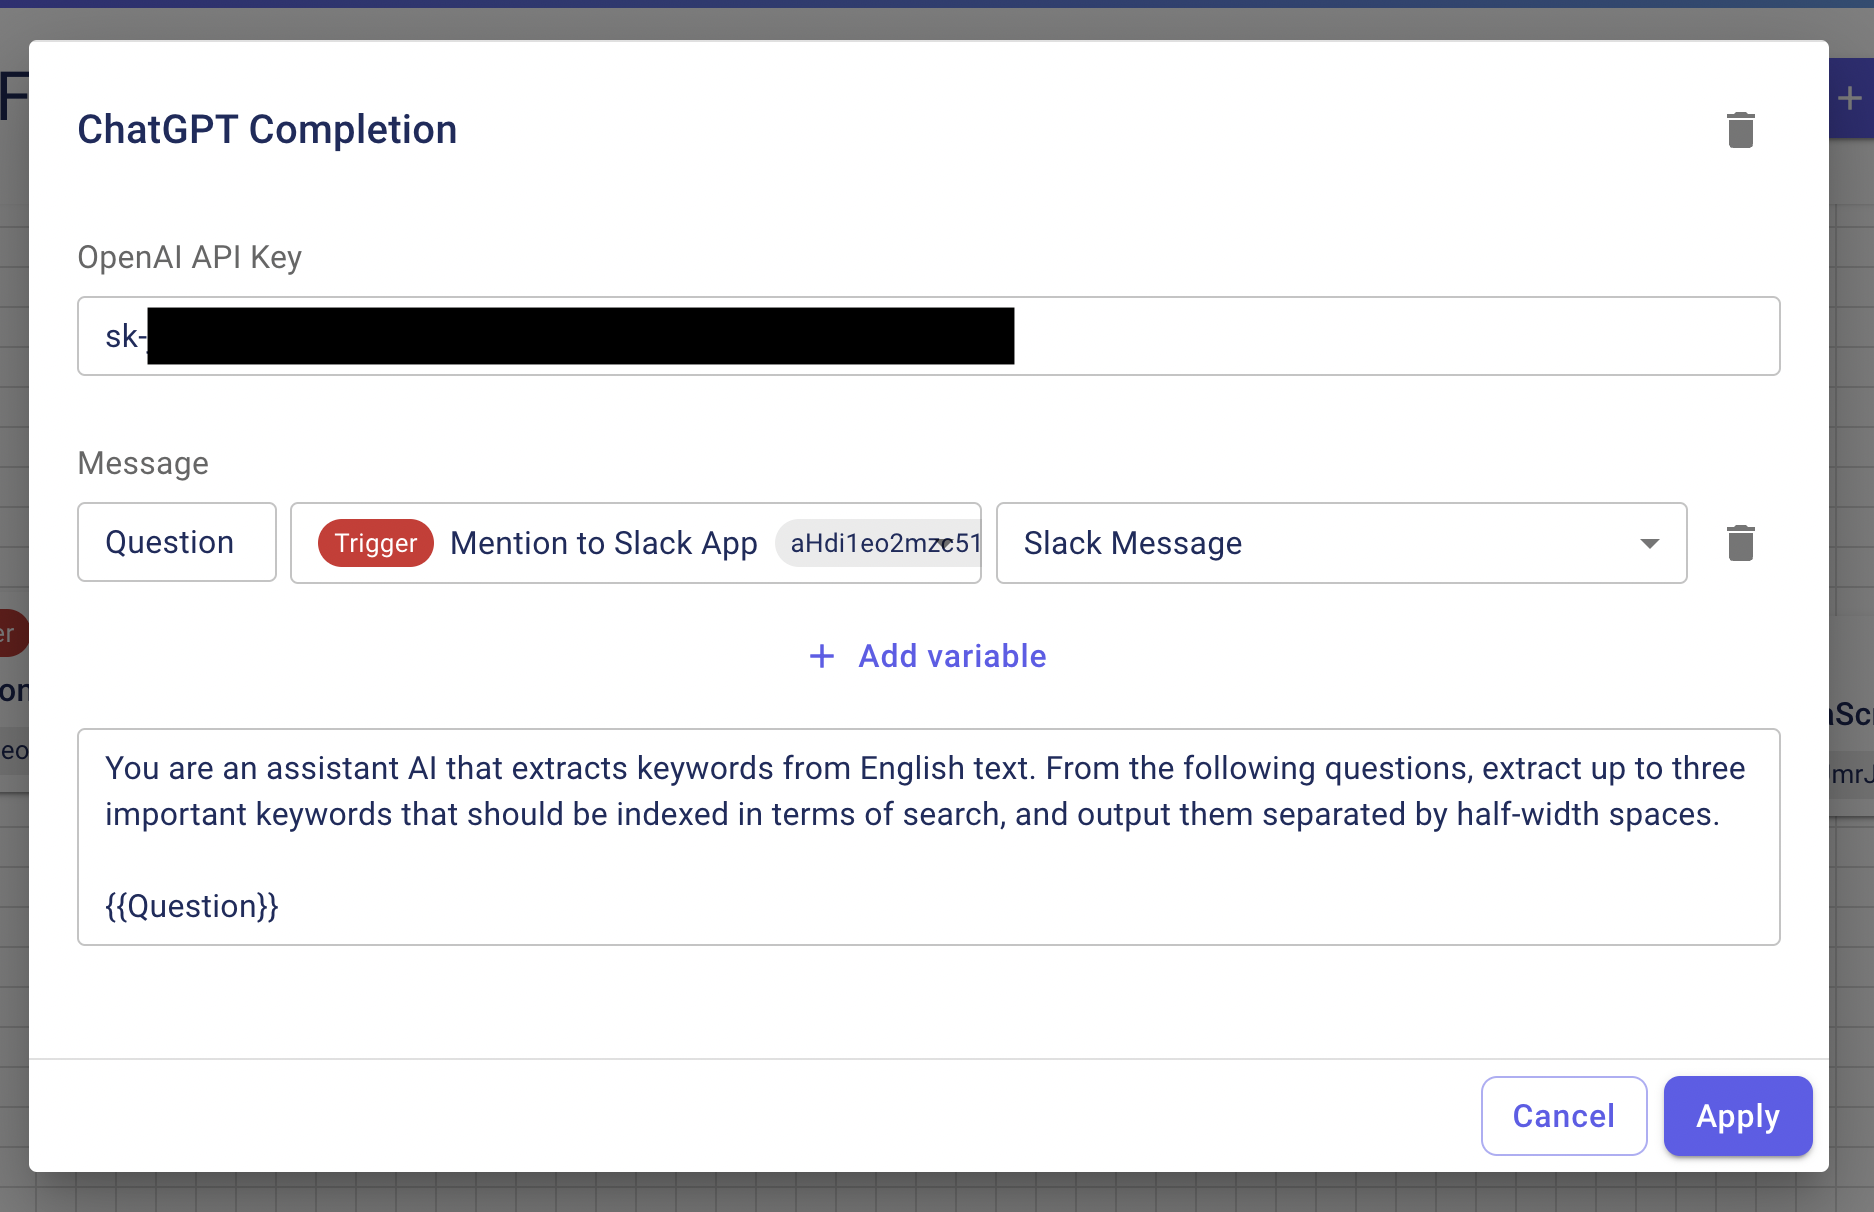
Add a "ChatGPT Completion" step and connect it to the "Add Resource" trigger.
Enter the following in the message.
You are an assistant AI that extracts keywords from English texts.

From the following questions, extract up to 3 important keywords that should be indexed in terms of search,

Output them separated by spaces.

{{Question}}
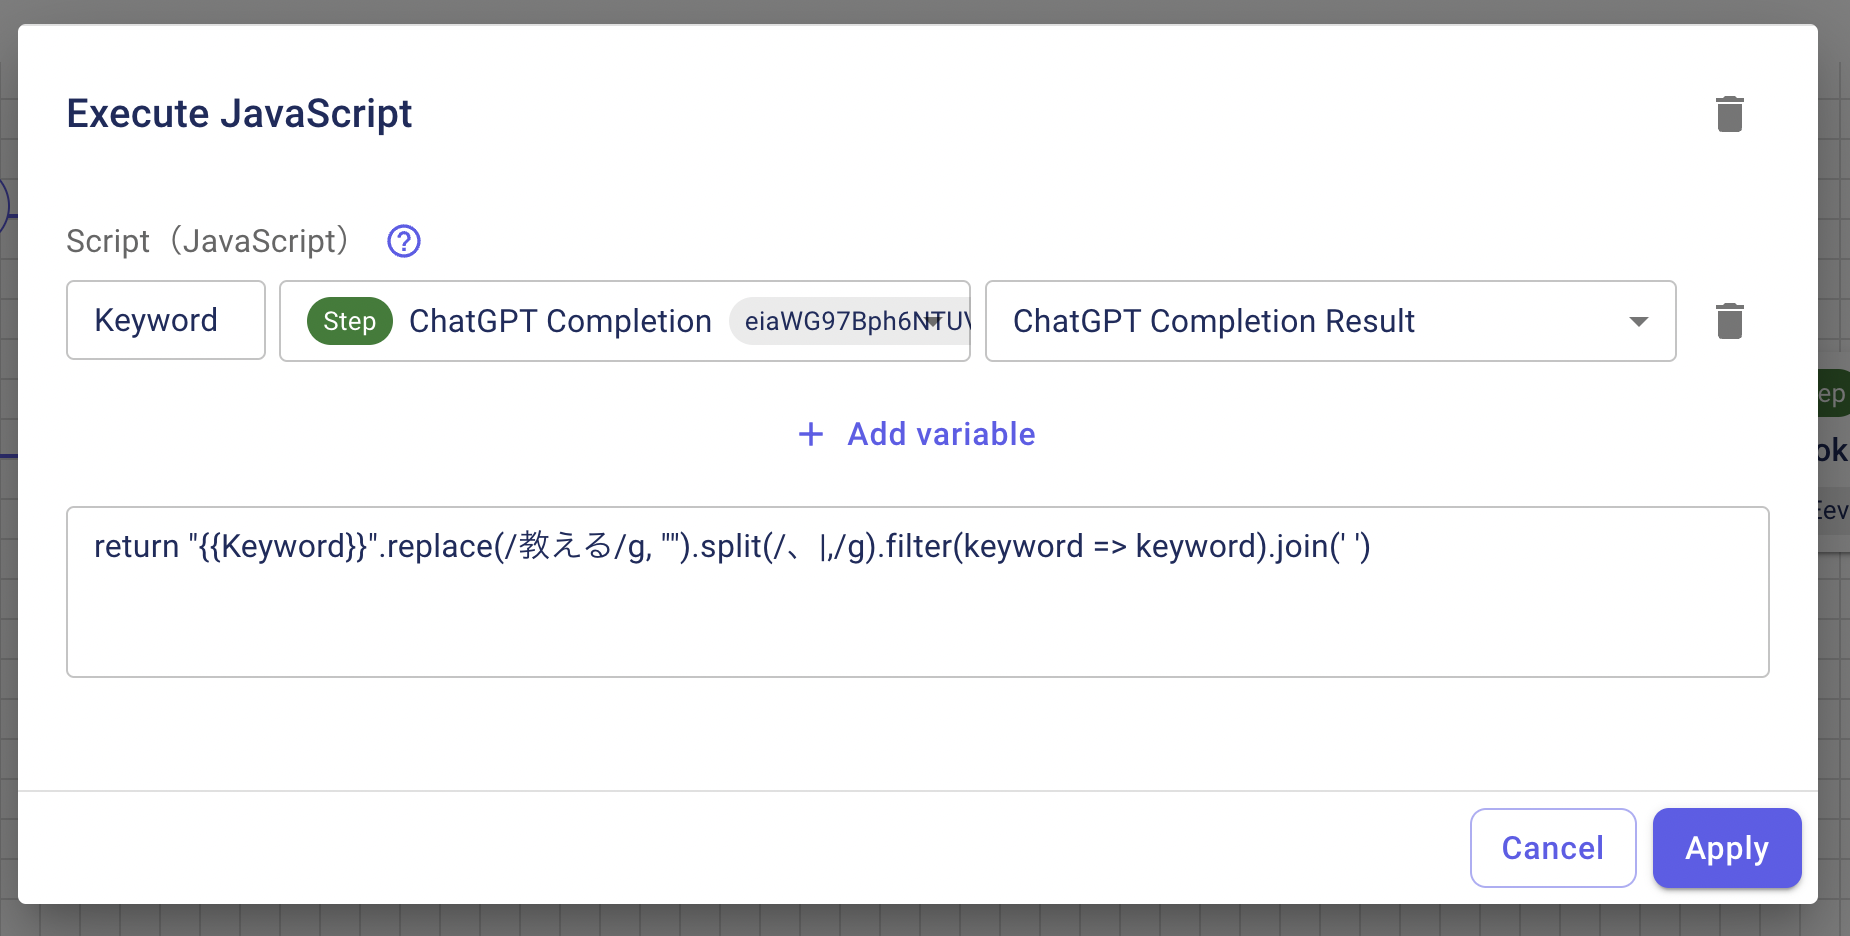
Add a "Run JavaScript" step to convert the ChatGPT results to half-space-separated keywords, correcting as appropriate.
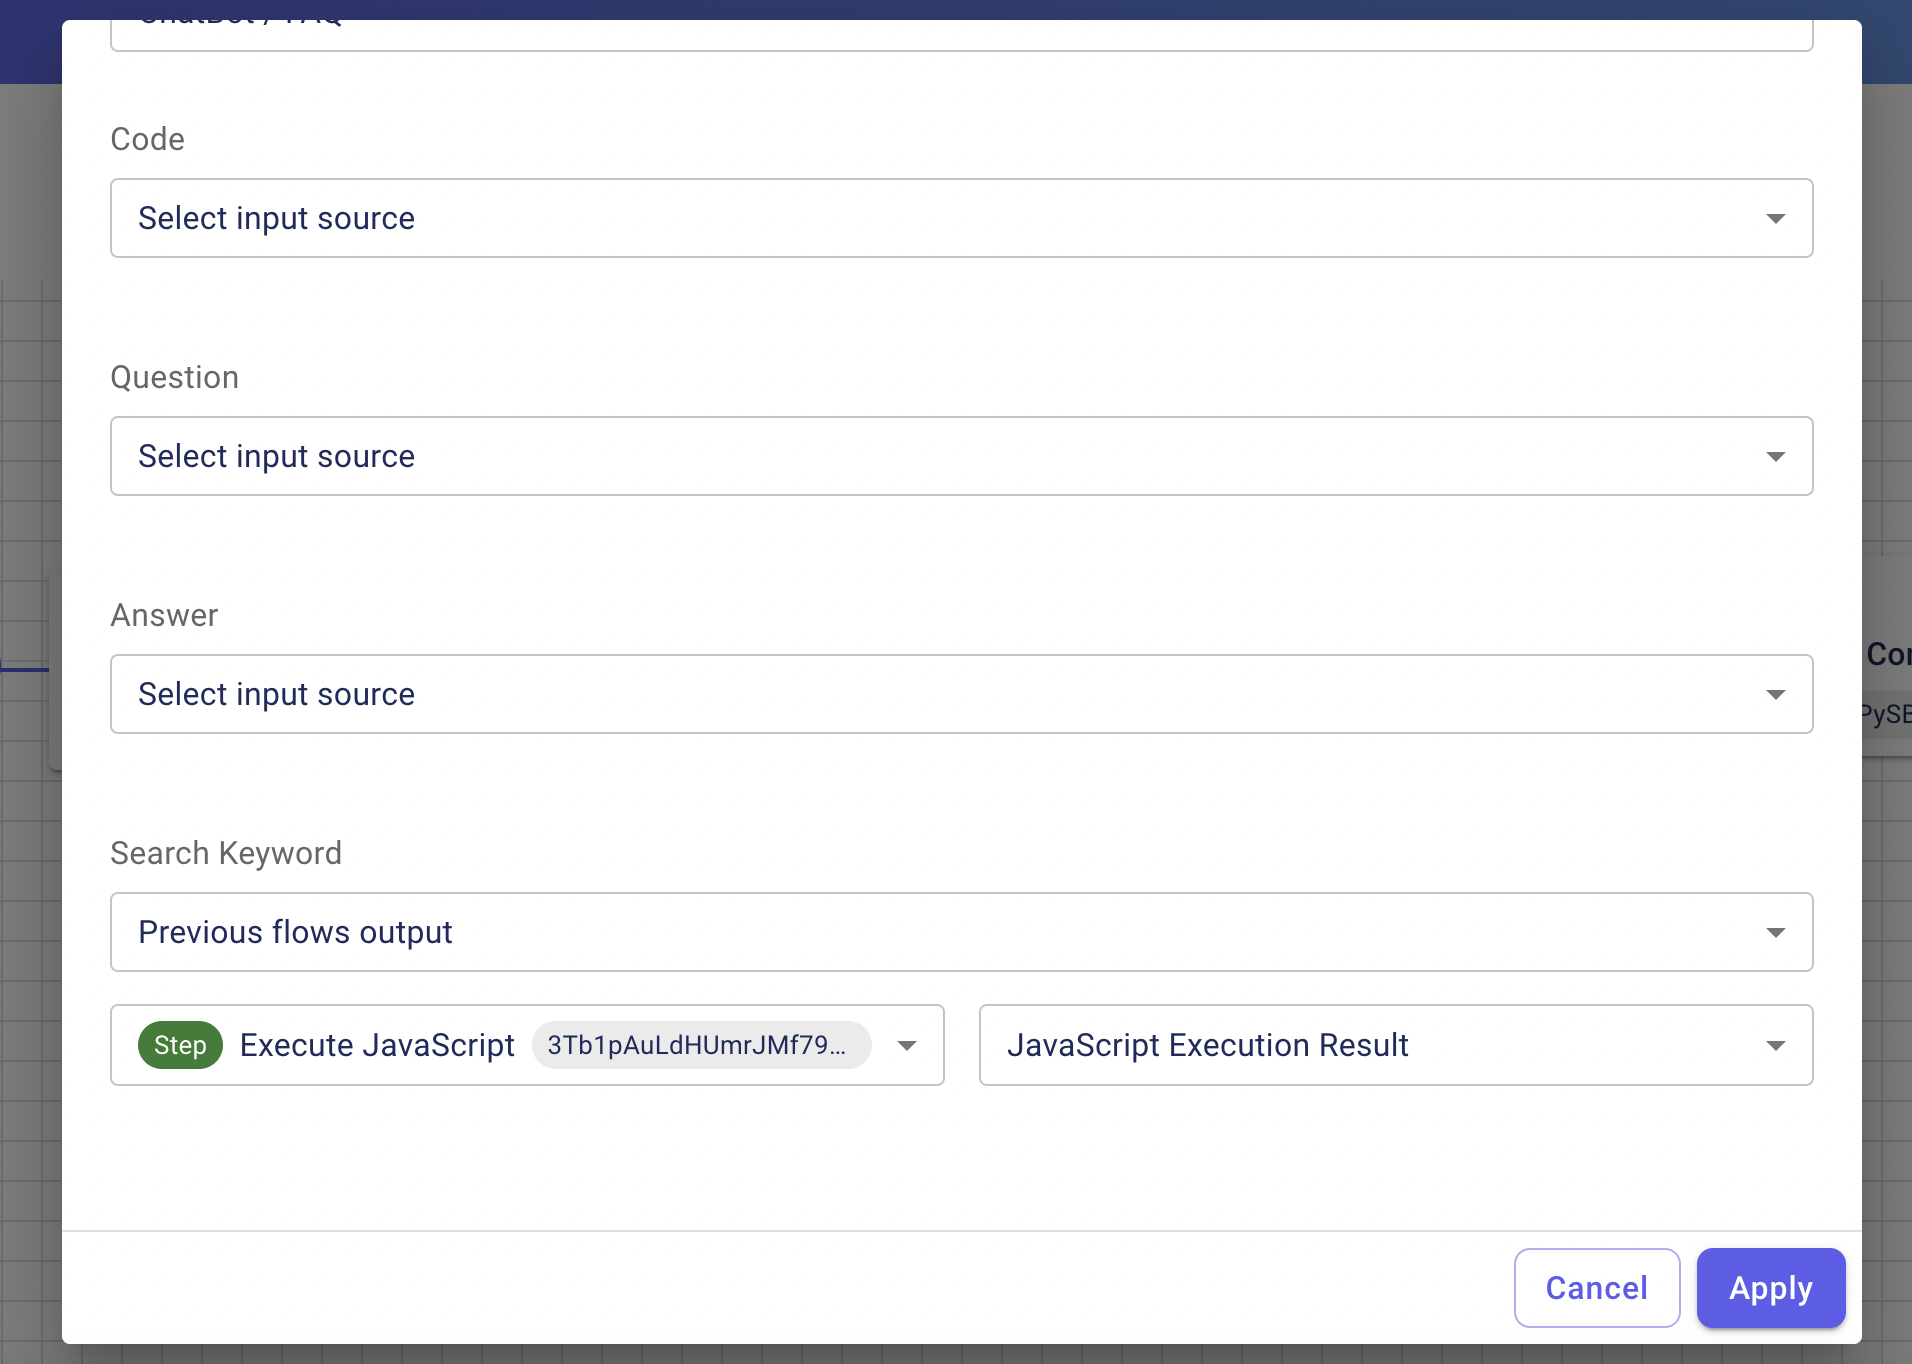
Add a "Lookup Resource" step and do a keyword search based on the normalized results.
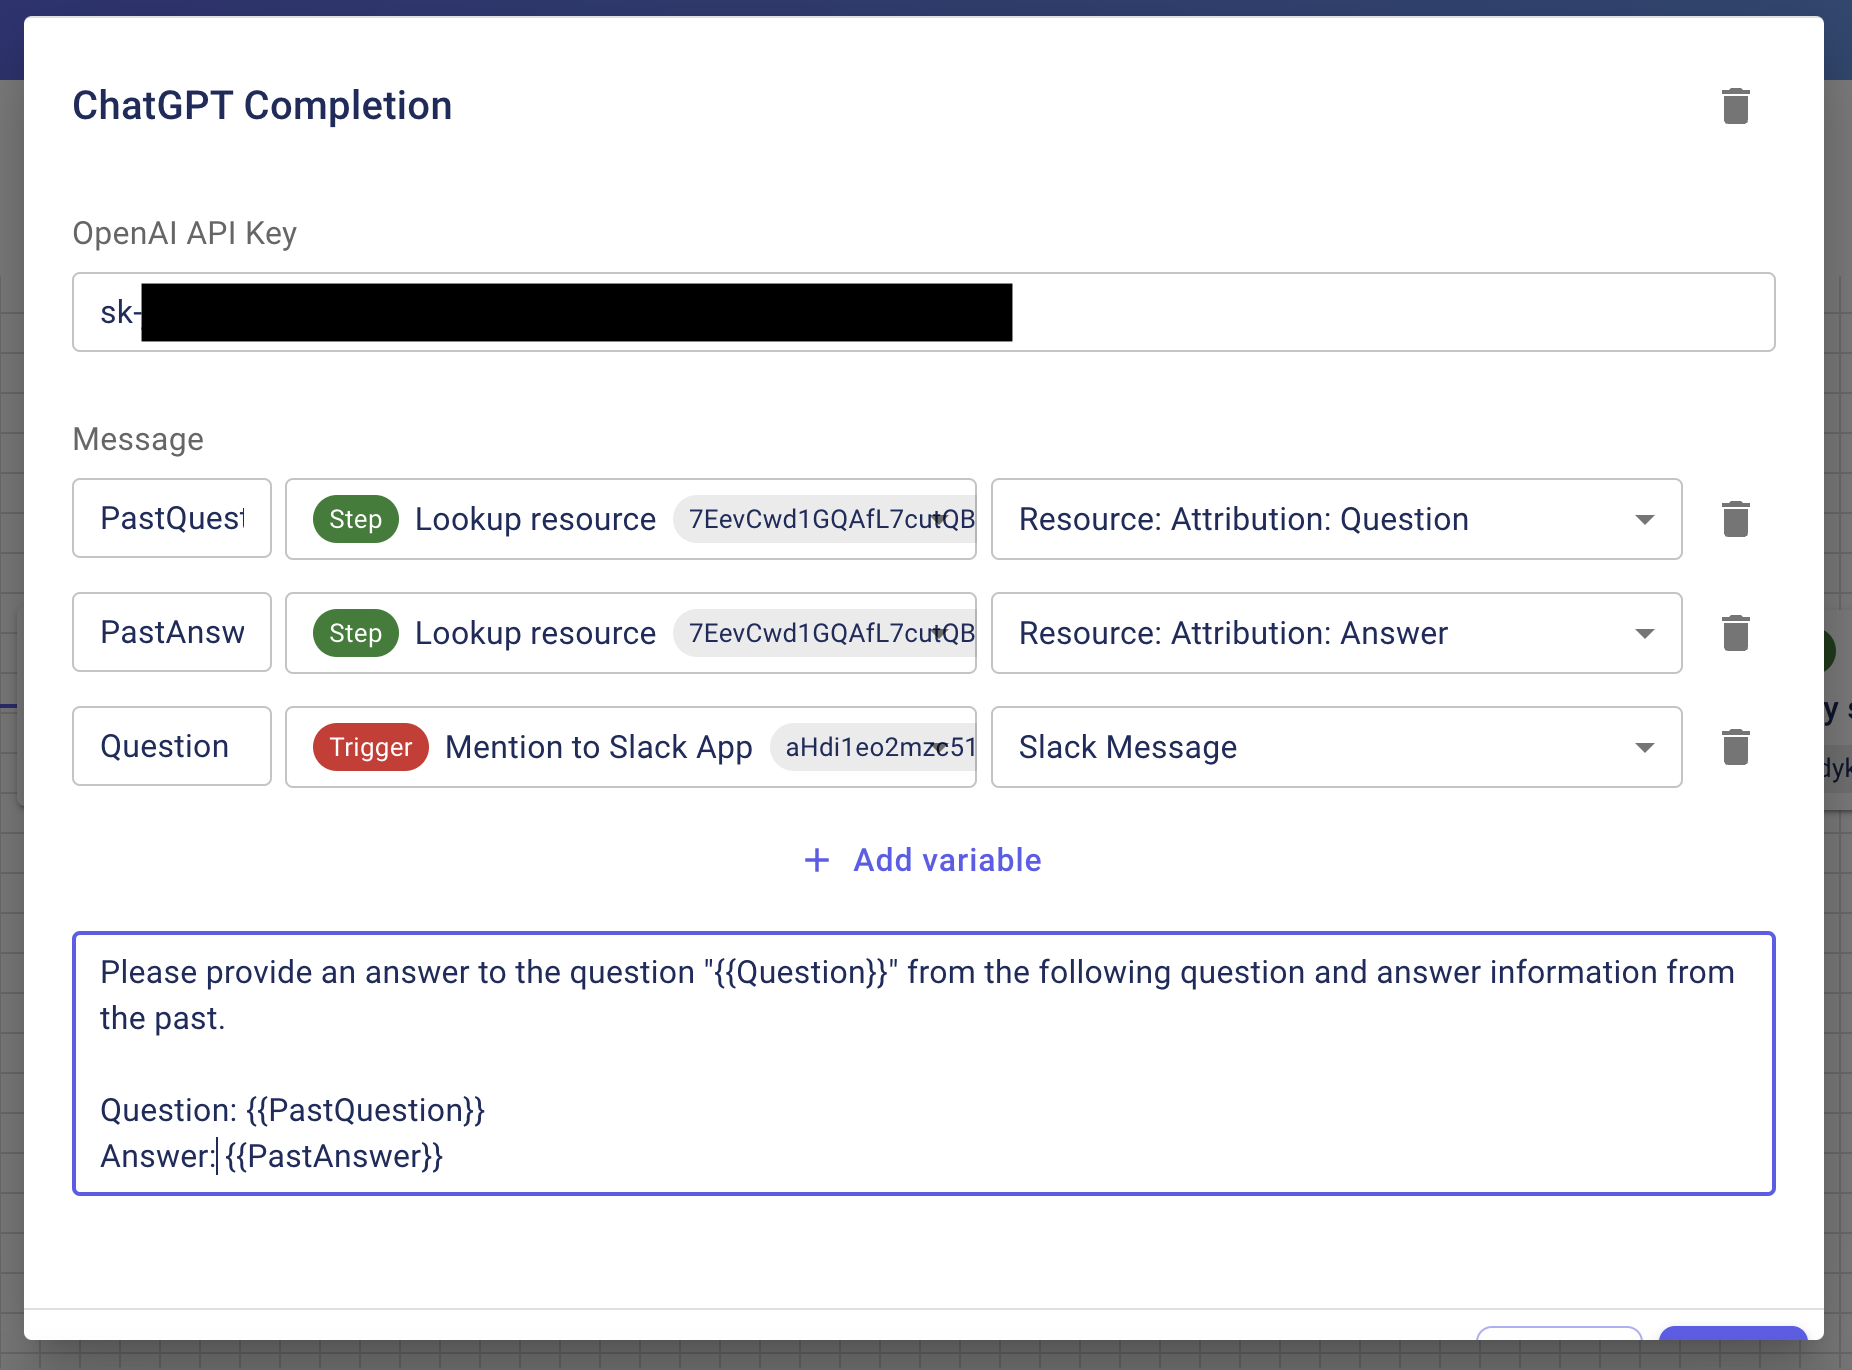
Add a "ChatGPT Completion" step and create an answer based on the search results and the mentions of the question.
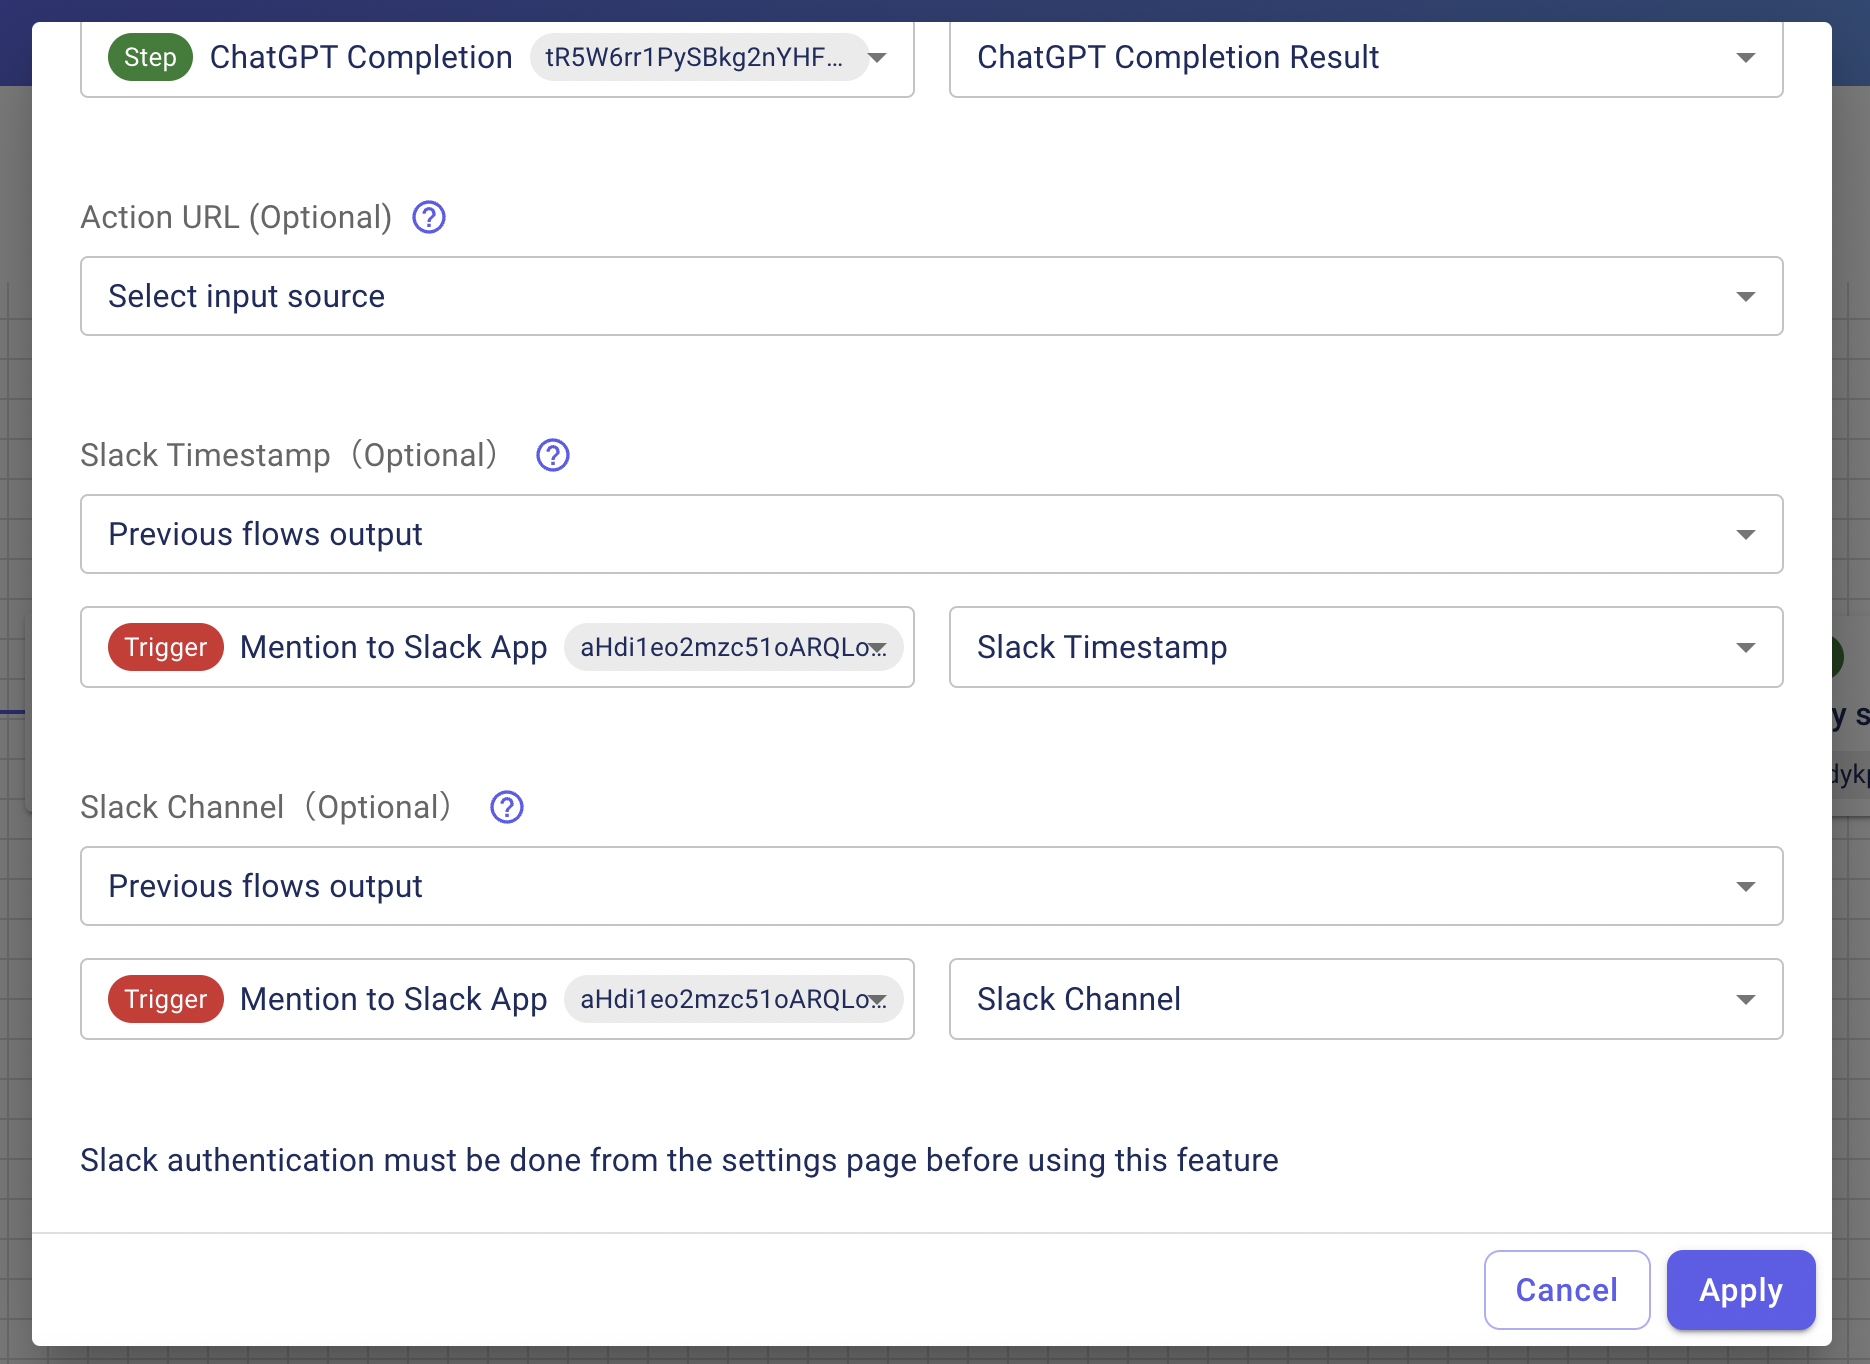
Add a "Slack" step to notify Slack of the created answer in the form of a reply to the questioner's thread.